• Skip to primary navigation
  • Skip to main content
  • Skip to primary sidebar

STEMS & FORKS

Beautiful musings of flora and fare.

  • Home/Blog
  • About
  • Recipe Index
  • Awards and Accolades
  • Contact
  • Workshops
  • Gallery

Holidays

Mochi Balls with Fermented Organic Blueberries from Chile

January 18, 2019 By stemsandforks 4 Comments

This post was sponsored by Fruits From Chile. All thoughts and opinions are my own

If you didn’t get it right with your new year’s resolutions this month, don’t worry. There’s another new year coming up on February 5th 2019 and you can start anew! With the Lunar new year just around the corner, I thought these Mochi Balls filled with lacto fermented organic Chilean Blueberries would be perfect to ring in the new year and provide a second opportunity to become healthier and kinder to one’s body and mind. 

Lacto-Fermented Foods:

So we all know how naturally fermented foods provide healthy probiotic bacteria. Stuff that’s good for our gut. Studies have shown that the natural probiotics created from fermentation also increases vitamin content thereby boosting our immunity naturally which helps fend off the flu and cold. (source) Consuming fermented foods are also safer to consume than raw as the lactic acids essentially kill off the bad bacteria such as E-Coli. (Source) And it has been proven time and again that improving gut health aids digestion thereby helping promote healthy body weight. It doesn’t stop here. There are a plethora of reasons lacto fermented foods are good for us. 

…

Read More »

Filed Under: berries, Fermented, Fusion, Gluten Free, Holidays, Sponsored, This Korean Bakes

Kumquot Orange Cake with a Grand Marnier Pomegranate Icing

December 23, 2018 By stemsandforks 6 Comments

This post was sponsored by Paderno. All thoughts and opinions are my own.

My long term memory is strong, vivid and somewhat creepy. A couple years ago I ran into a classmate from grade 5 on the bus. Her face was exactly the same. Dimpled chin, large freckles and green eyes. I had fond memories of her. The first time I ever had a pomegranate was in fact when Kelly offered me half the fruit. I still remember sitting in the classroom portable and Kelly telling me that we had to count how many little “ruby” seeds there were in one pomegranate. It was something she would do with her brother at home. Count every single red juicy gem and report back home on a pomegranate chart. Apparently the average was 500. 

I remember that first seed I popped into my mouth. The sweet, sharp yet sour juice bursting in my mouth was unique. And simply a lot of fun plucking the little gems and counting them. 

…

Read More »

Filed Under: Cakes, Holidays, Sheet Cake

Spiced Rum, Date, Walnut, Molasses Bundt Cake with Rum Caramel Drizzle

October 7, 2018 By stemsandforks 17 Comments

Koreans can’t bake.

That’s been my insecurity since starting this baking journey. That I’m Korean. And unlike my fellow caucasian friends, I have no family pie recipe or a mom that baked chocolate chip cookies with me on Saturday mornings. The only things I baked as a child were Pillsbury crescents from a tin or boxed Duncan Hines. Baking from scratch was never a part of my family growing up.

Instead, my Saturdays consisted of Korean language classes followed by math drills with Sargent Shin… and his chopstick wand. After math, my sisters and I would get to watch some TV whilst stuffing thousands of Korean dumplings called “mandu”. Okay. Maybe not thousands but god did it ever feel like thousands! Only after all the mandus were stuffed and our math drills were done correctly, were my sisters and I allowed to bake Duncan Hines Classic Yellow Cake. And if we were really lucky, my mom would have bought the chocolate icing in a carton for us to ice the yellow cake with. As a child, baking this cake and devouring it was my escape, my utopia, my moment of being unkorean. 

…

Read More »

Filed Under: Bundt Cakes, Cakes, Fruit, Holidays, My Journey, This Korean Bakes

Earl Grey, Sesame and Cassonade Weave Bread

March 28, 2018 By stemsandforks 3 Comments


As I continue on my Stems & Forks journey, I’m learning that my recipes are truly about taking the ordinary and making them extraordinary. Such as this weave brioche. I’ve taken this classic weave bread and doubled up on the layers by having 4 tendrils of dough rather than 2 crisscrossing. In fact, altogether there are 8 tendrils weaving in and out, creating a kaleidoscope of sugar, dough and buttered sesame seeds. If you love a more “pillowy” bread, feel free to make this into a two-roll (but with 4 tendrils) bread. I just love having loads of buttery sesame seeds intertwined with the brioche.

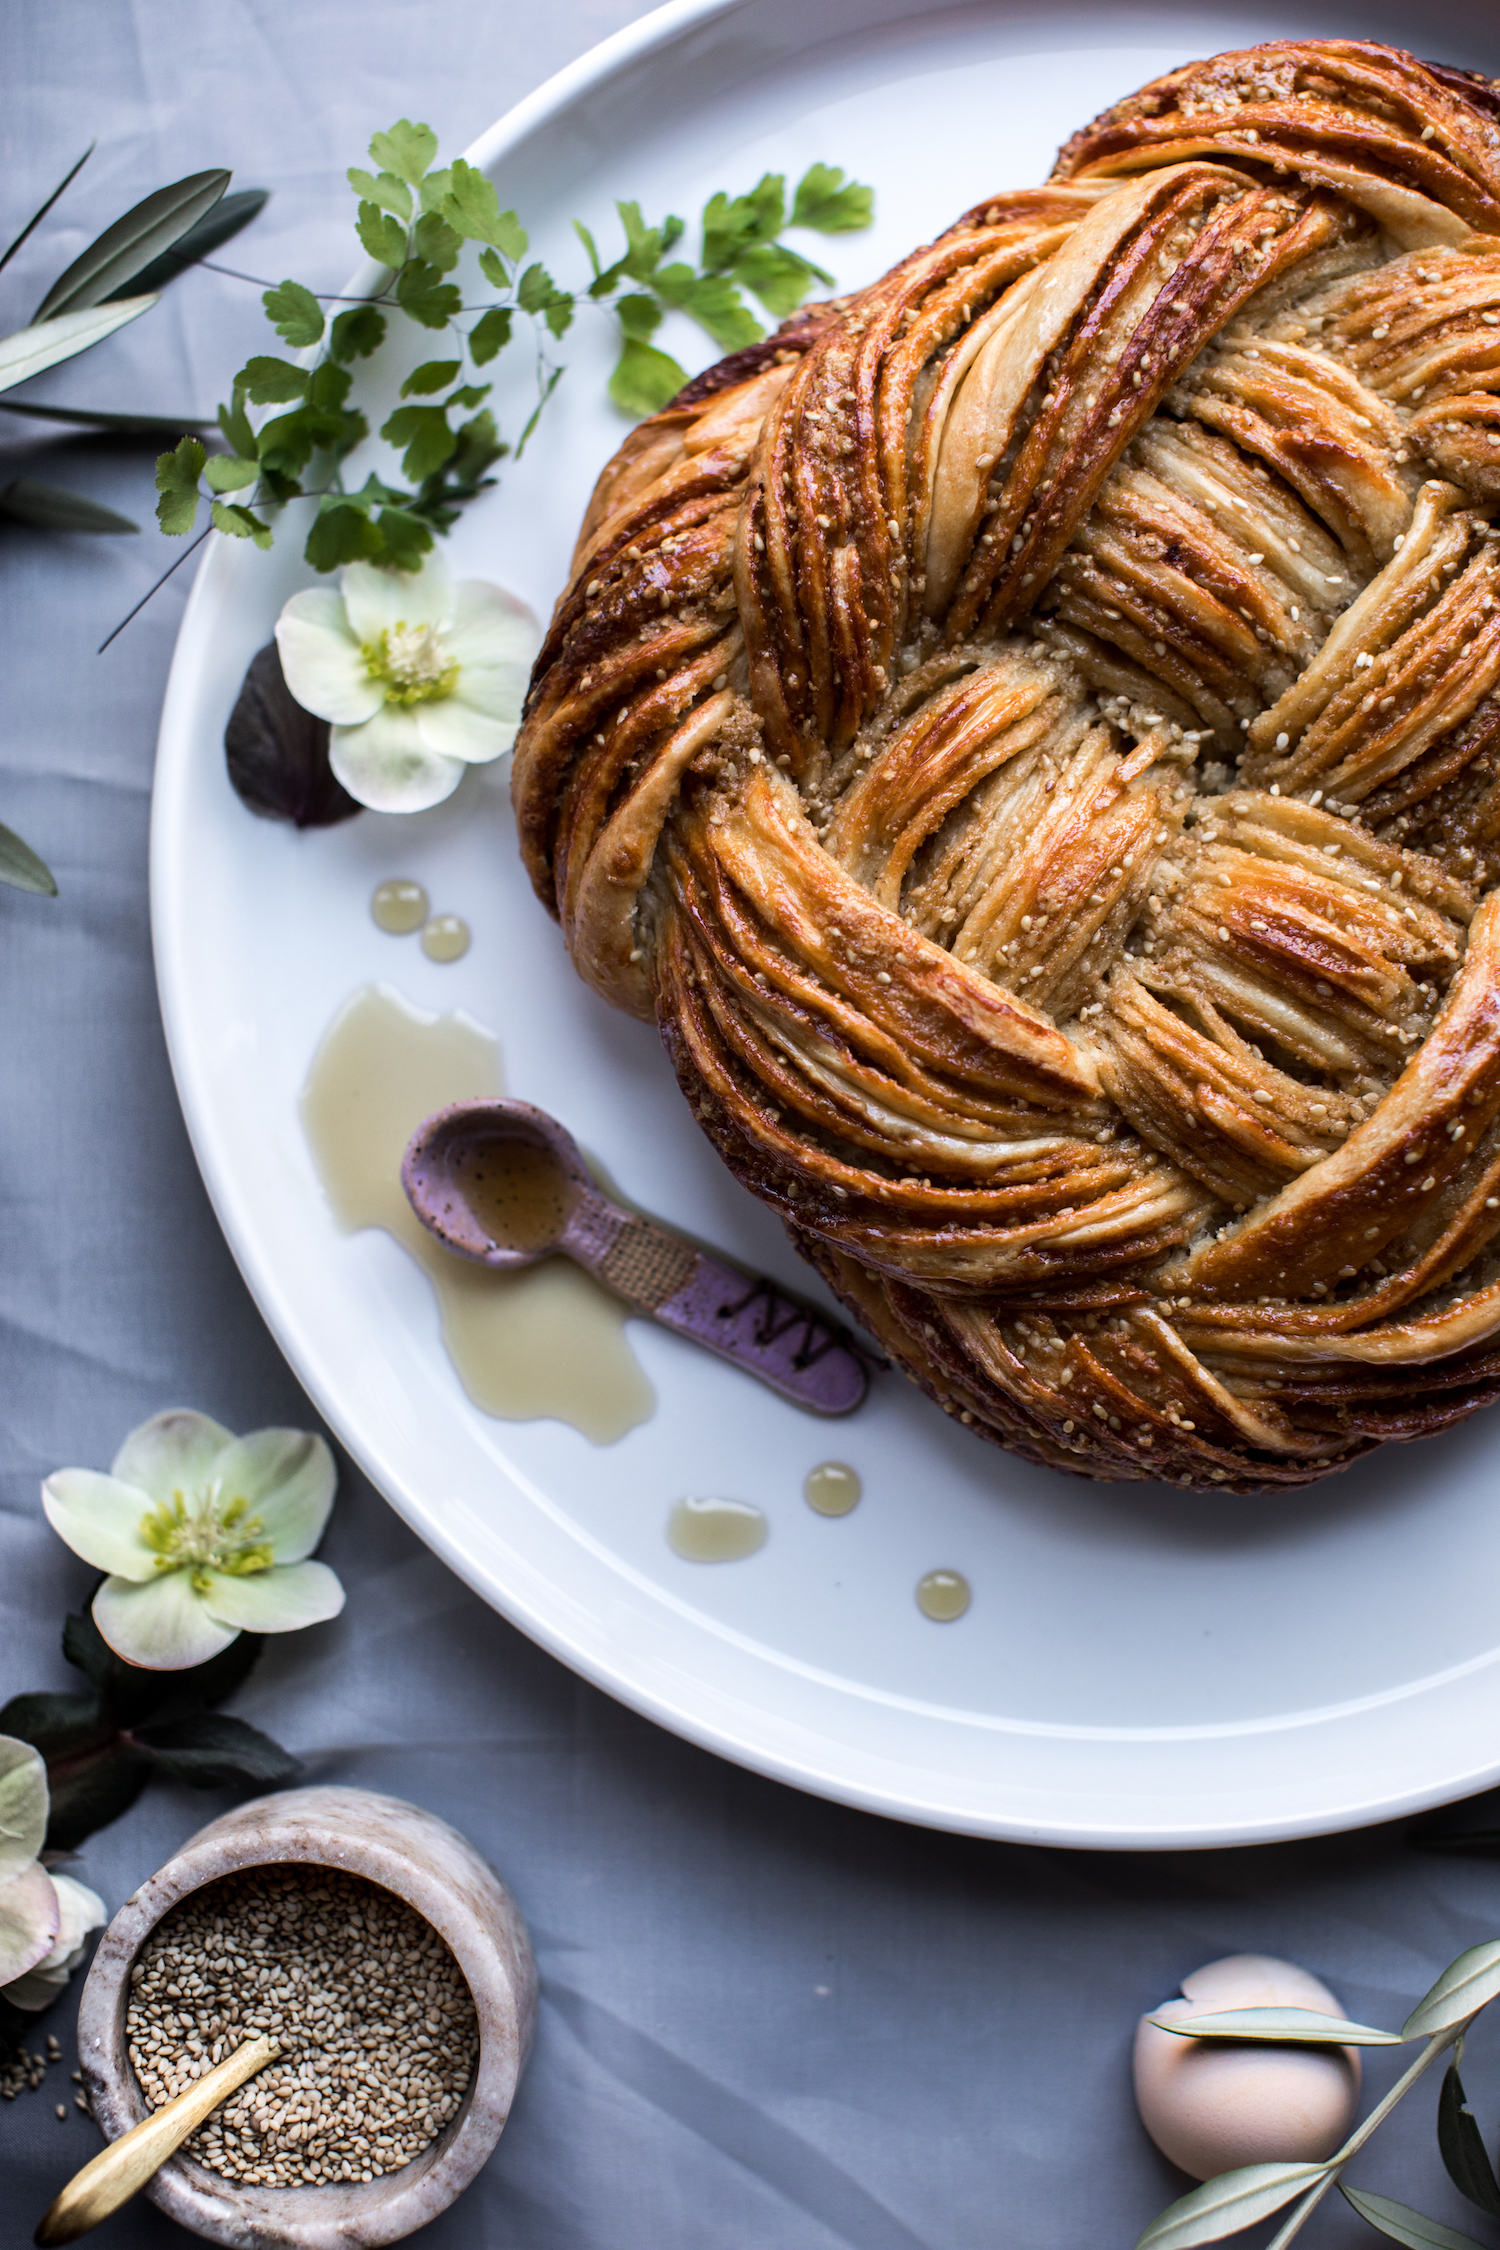
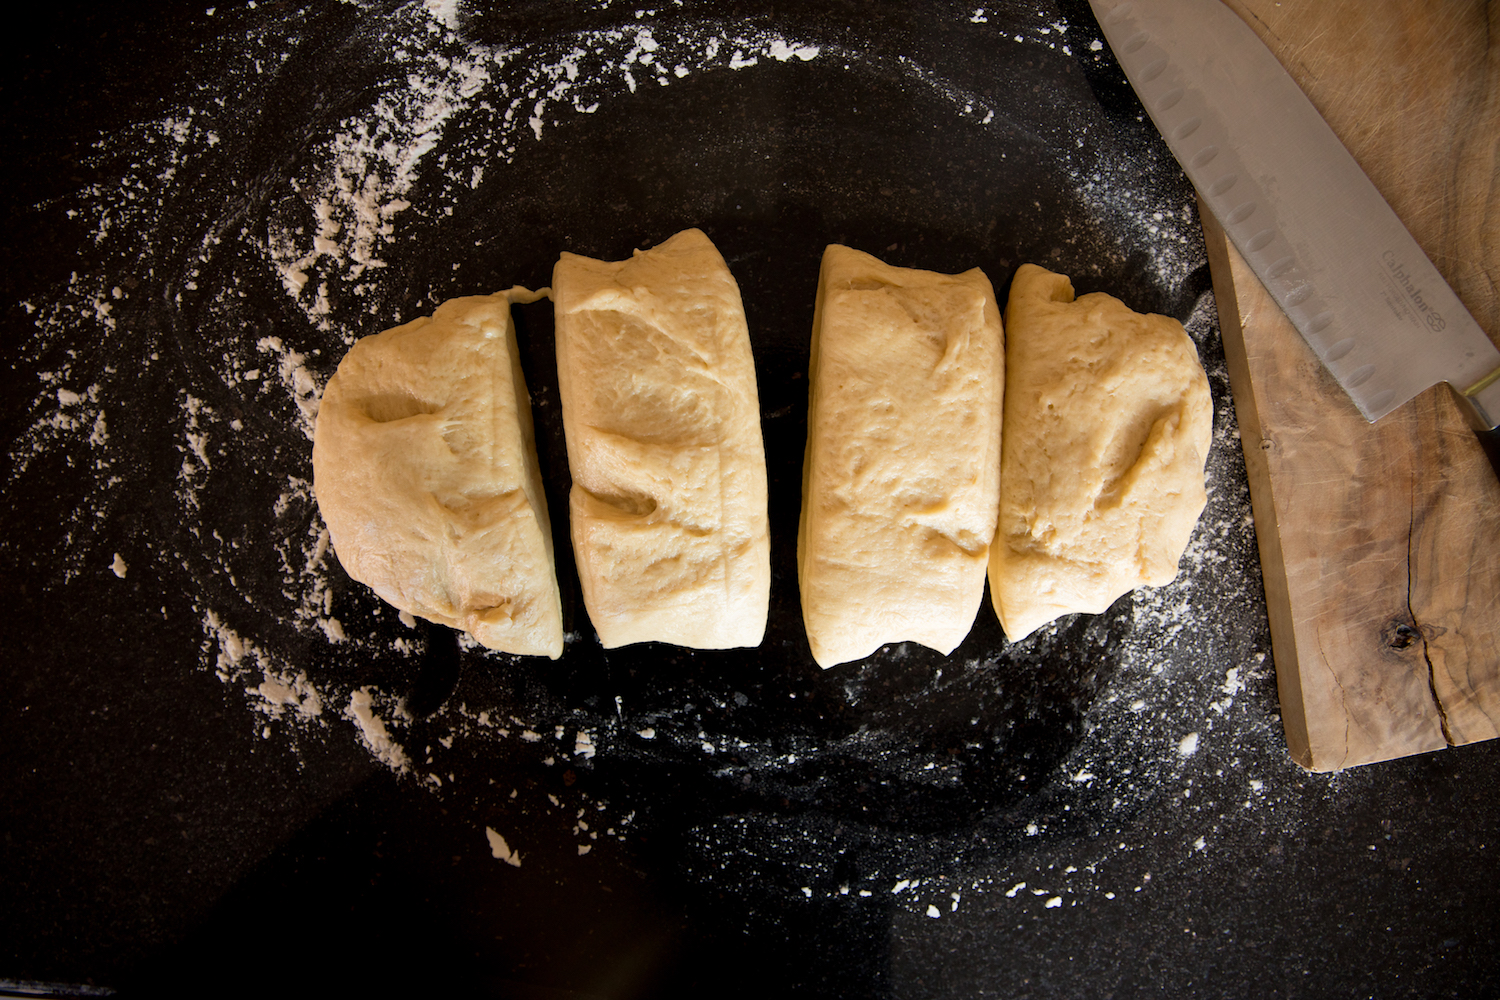
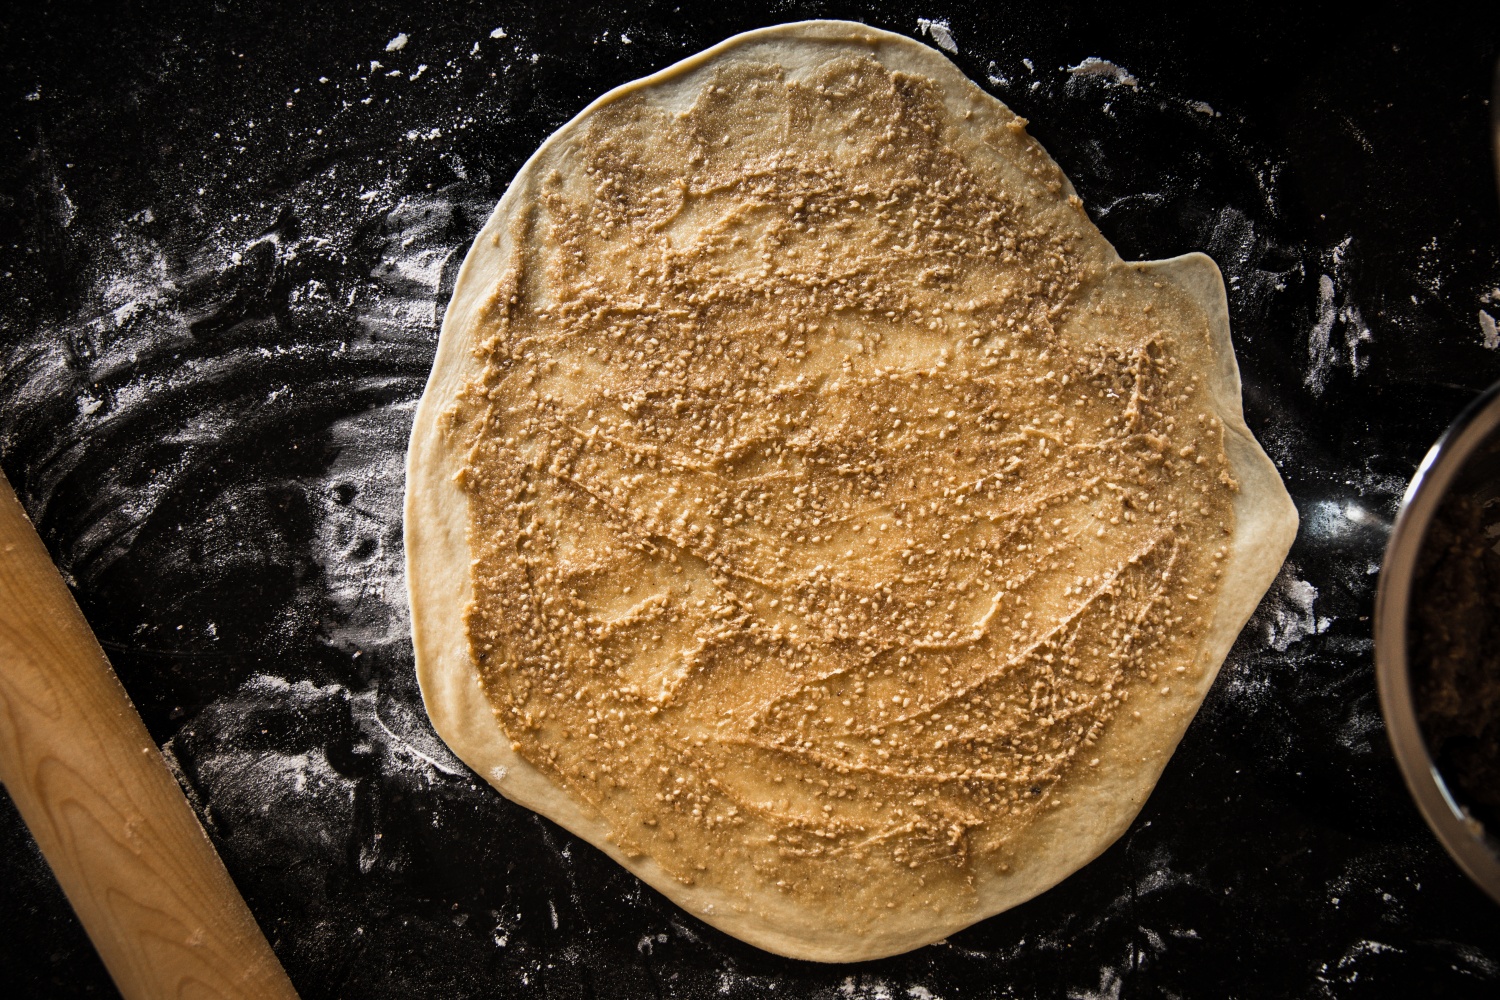
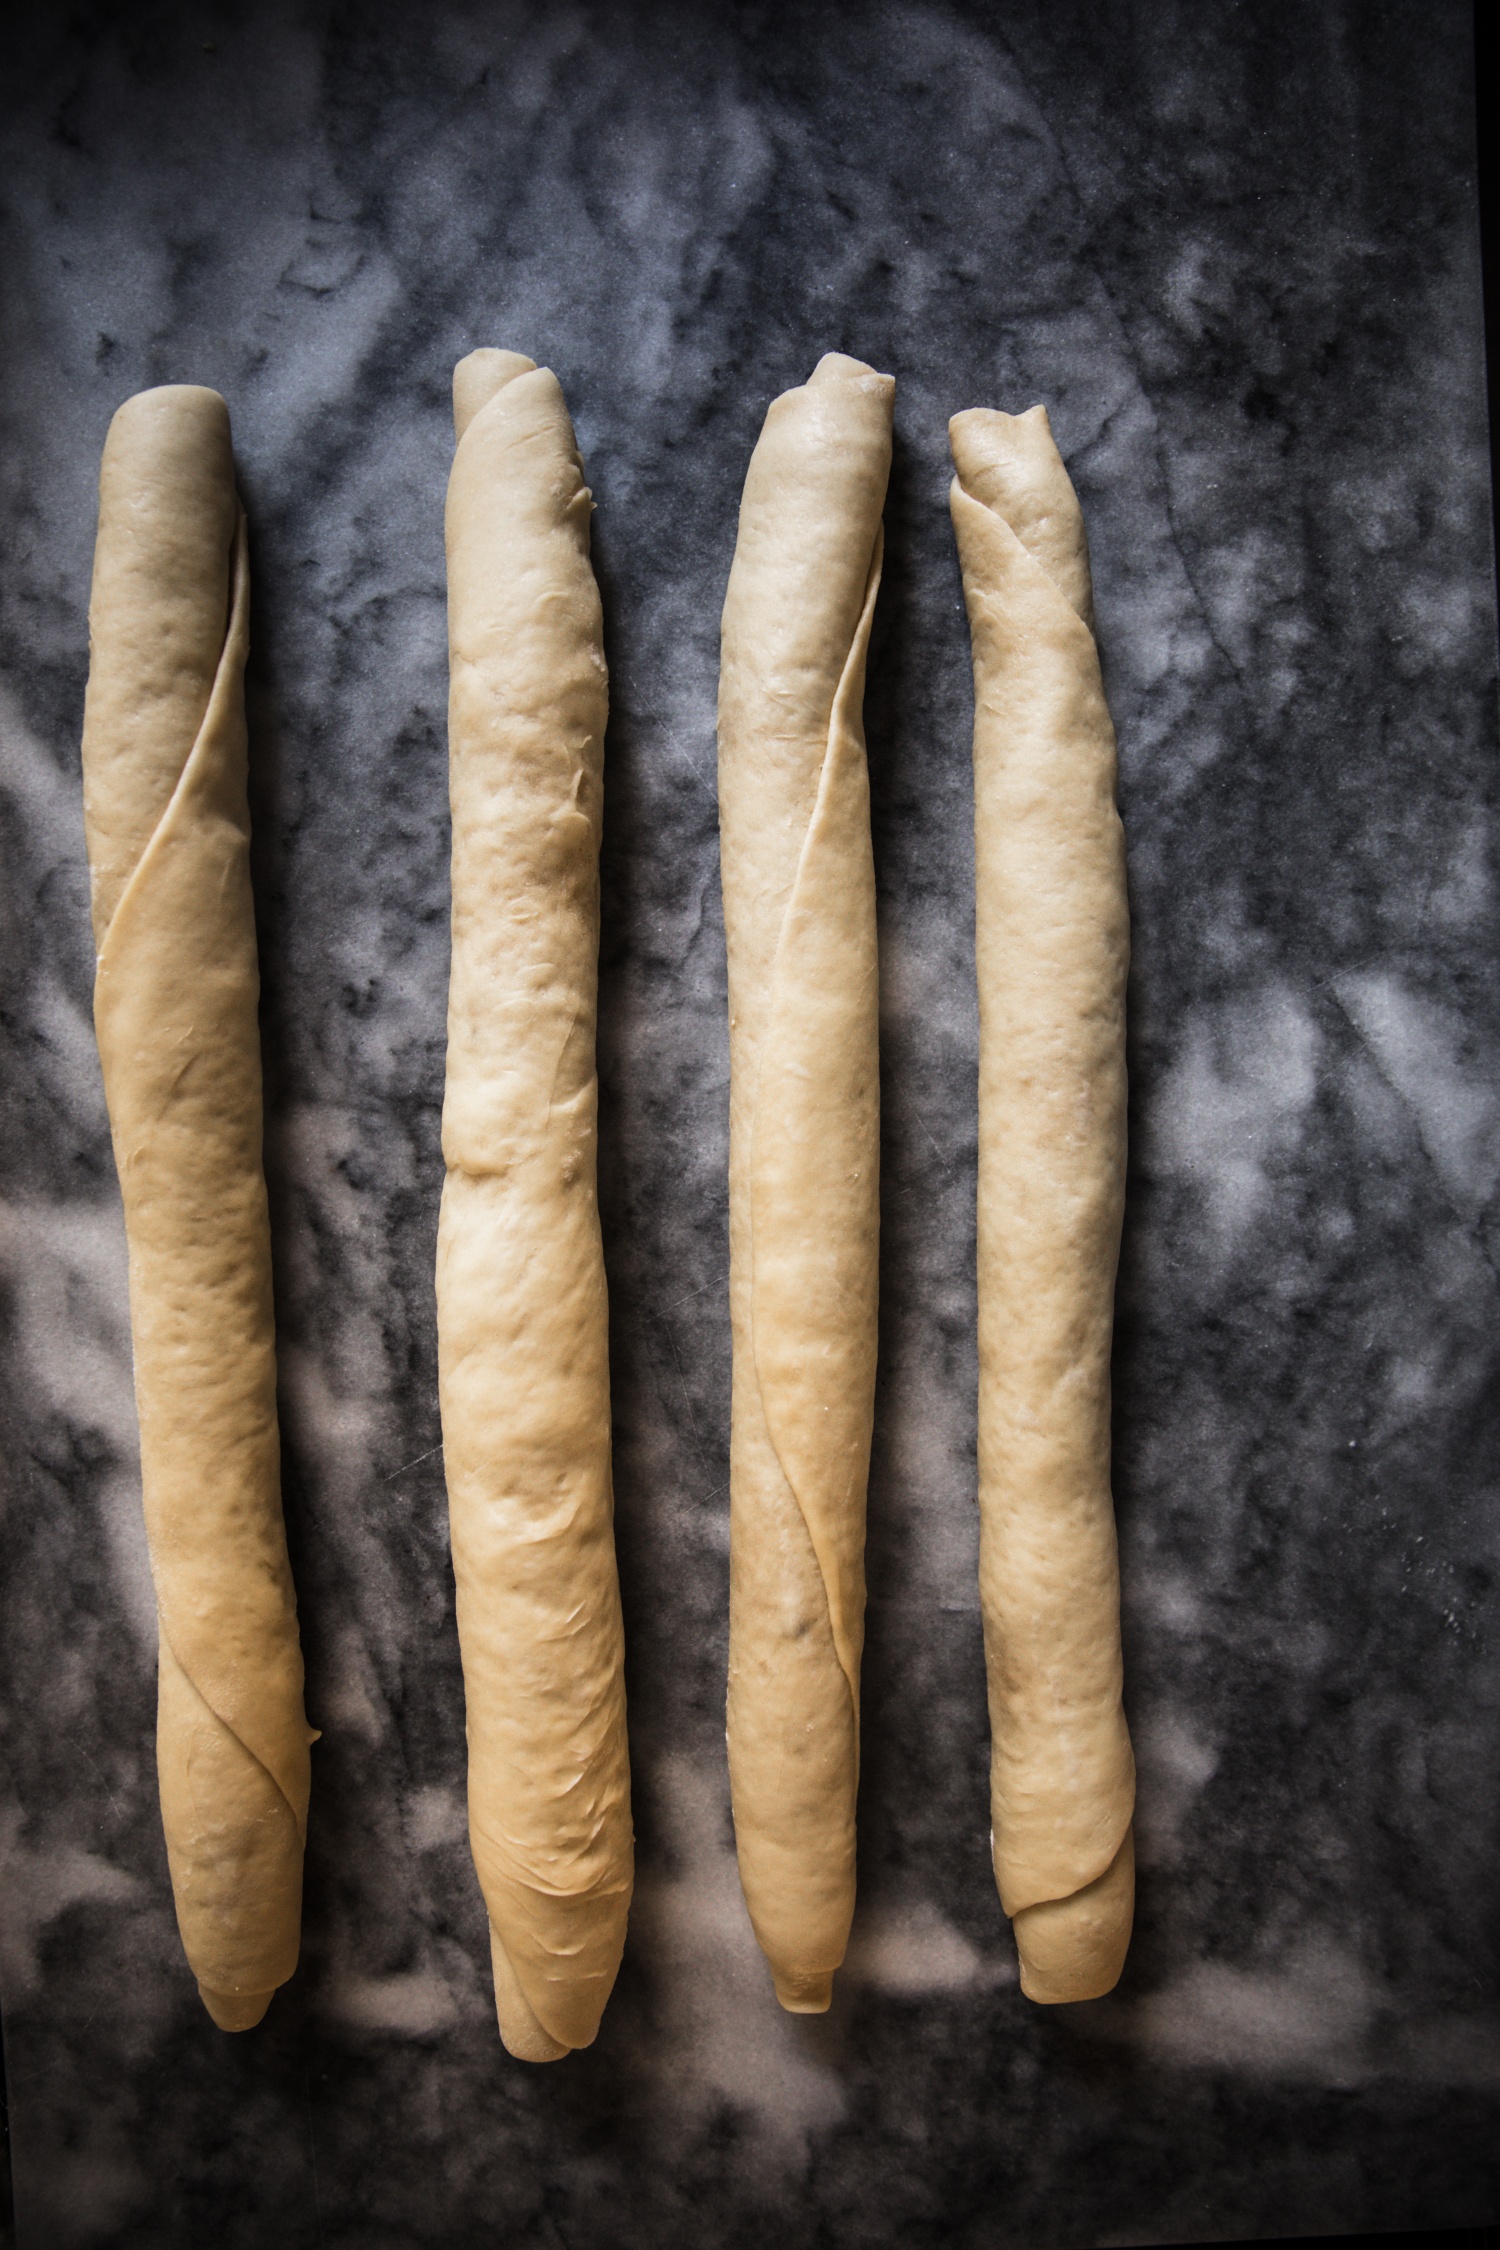
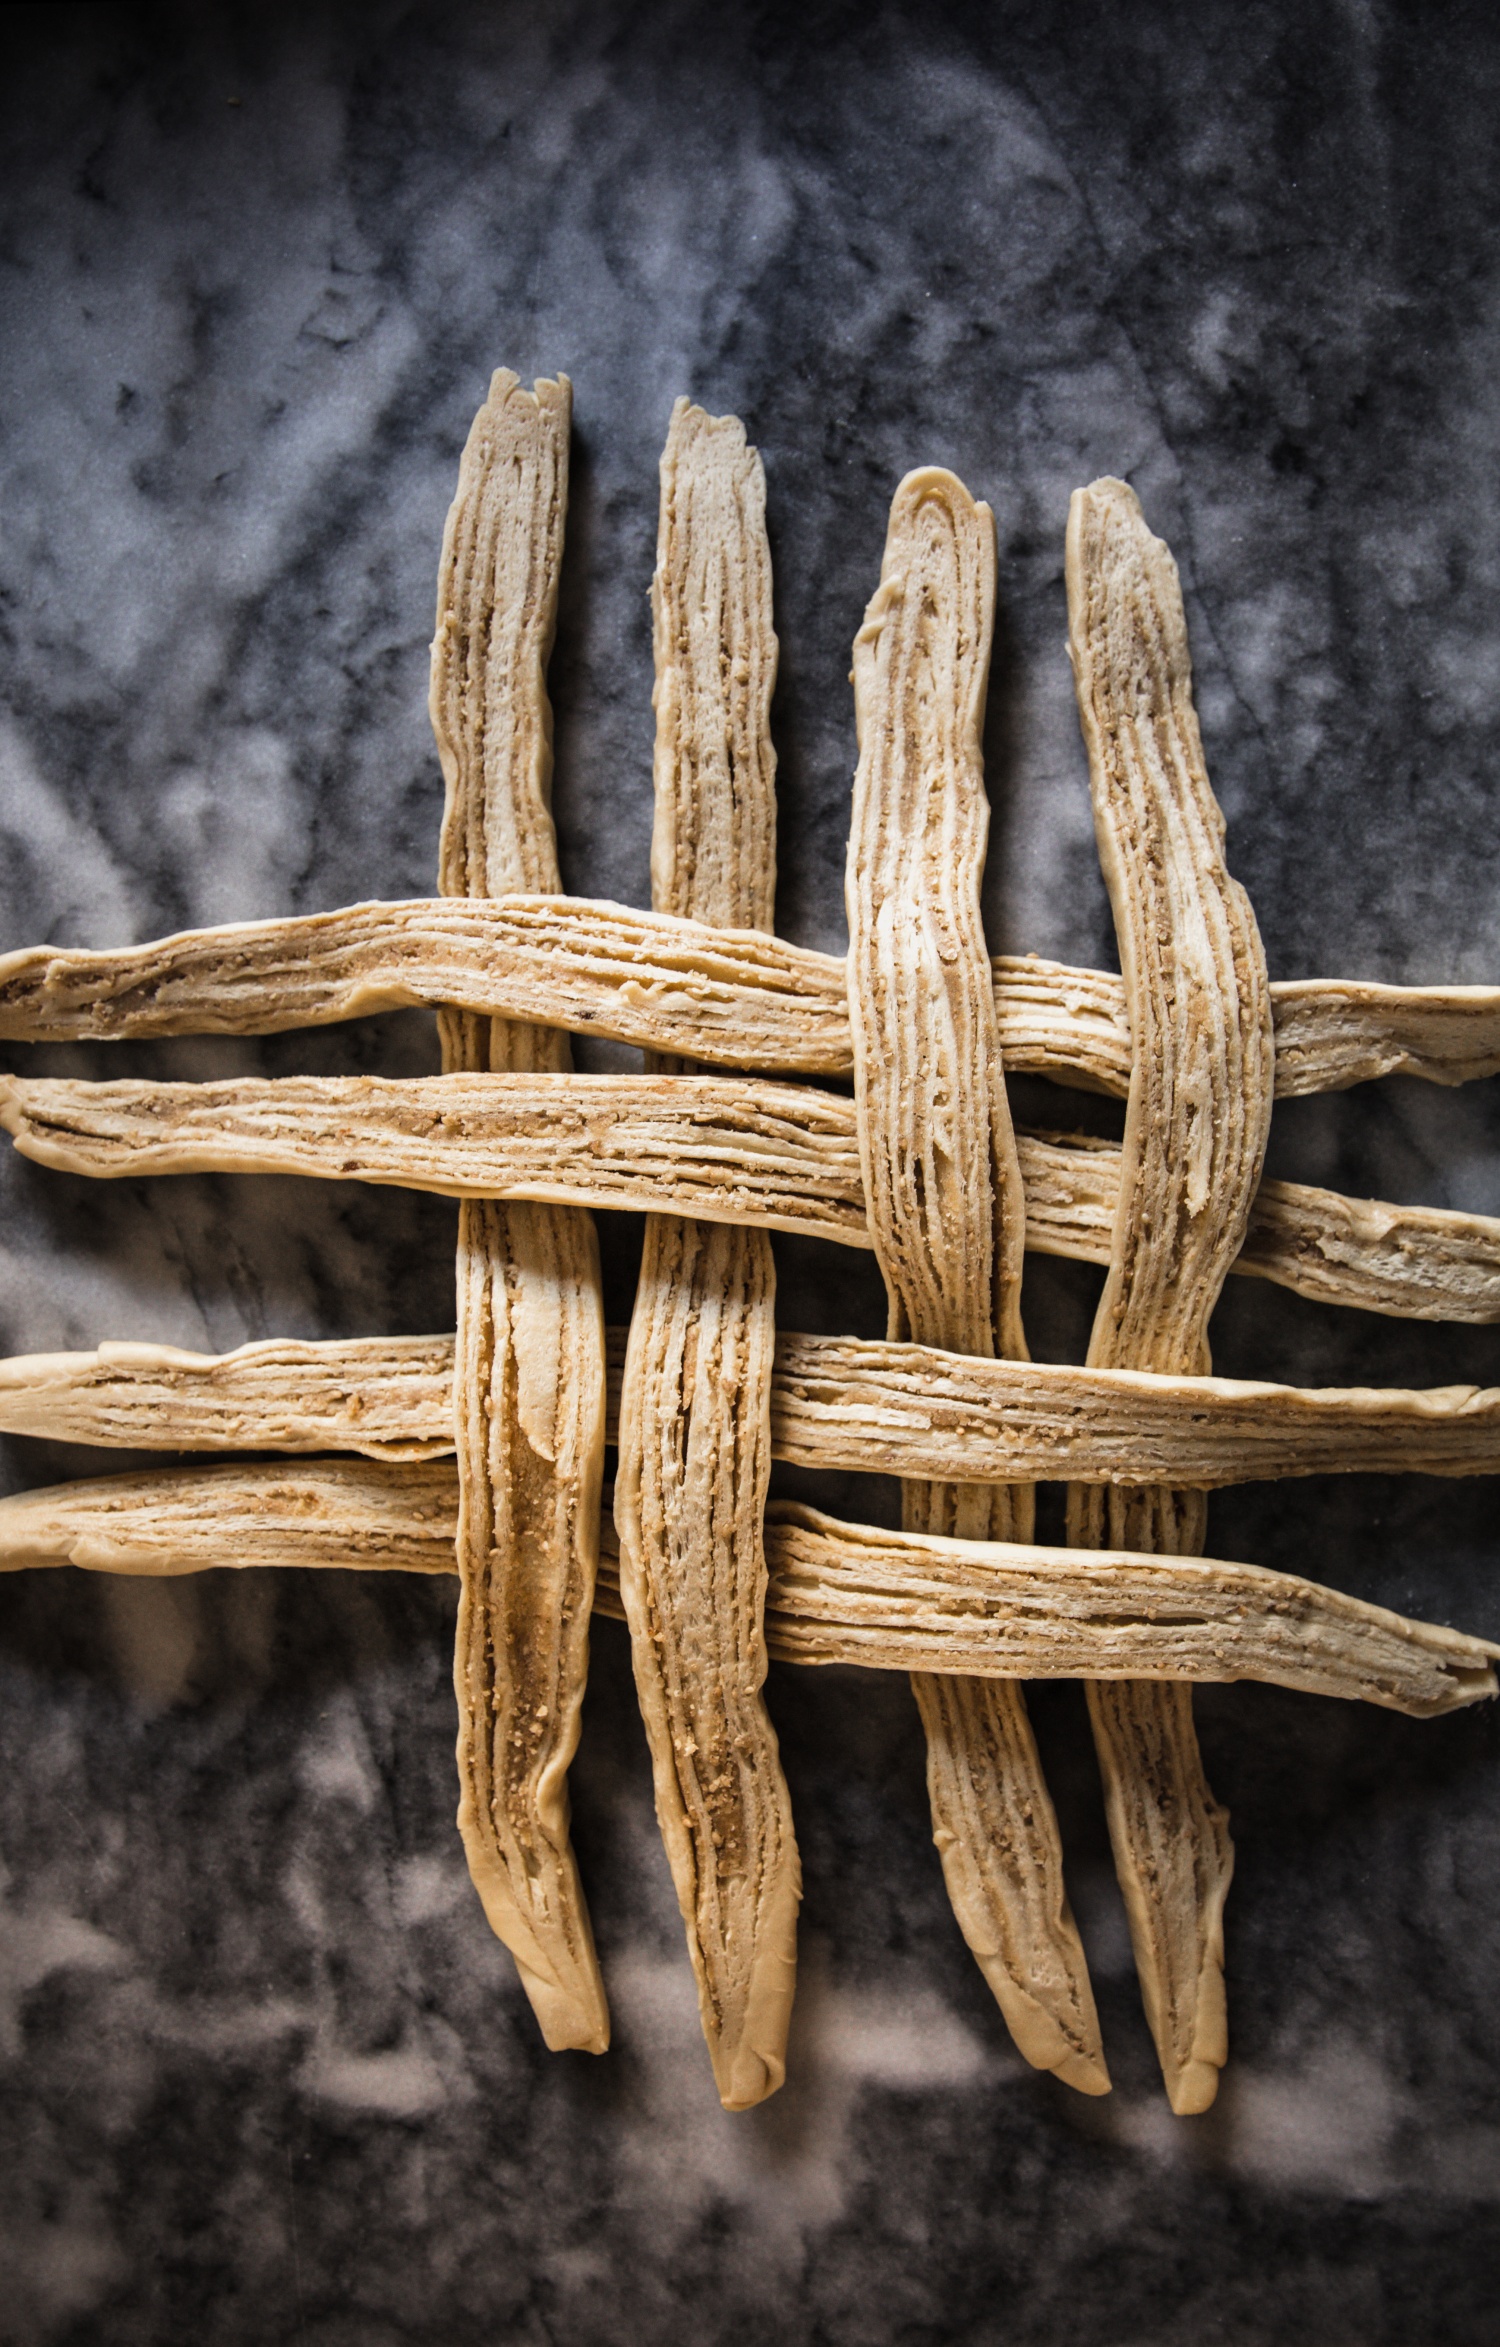
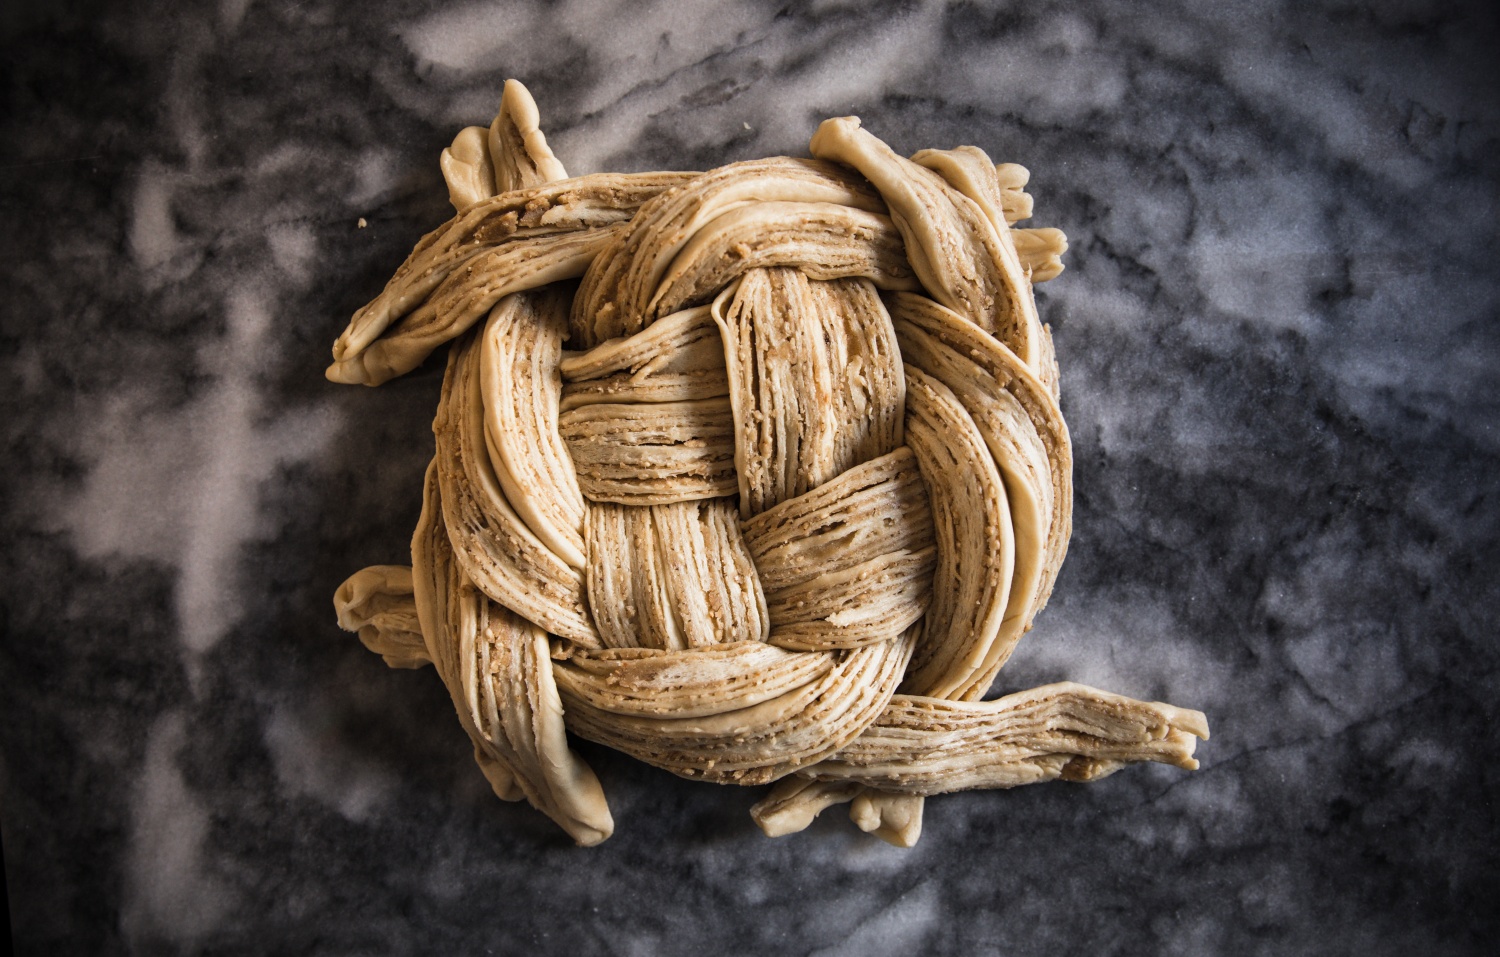
I know you’re thinking, “This looks hard!” I assure you it’s not! If I had to compare it to another task that might seem initially difficult- it’s like sewing a button. Actually, I don’t know how to sew a button. Rewind. Erase. It’s like learning to tie a shoelace. It seems complicated at first, but once you get into it, you’ll find your groove and it’s a cinch. A kid could even weave this bread. It’s that simple. You just need to follow the steps. And the pictures below will make it a no-brainer. I promise.

I don’t say this often, but this has definitely become one of my favourite recipes. I made this on a Friday but photographed it the following day. It was still moist and wonderful. Now I say it’s enough for 5-6 people, and with that being said, my husband and I finished it with a pot of coffee in less than an hour. But I guess my husband and I don’t qualify as normal people. We have no self-discipline when it comes to deliciousness! Make 2 if you expect company.

Wishing you and your family a happy Easter, Passover, Spring.

Bon App!

2. Take about a quarter of the filling and spread leaving about half an inch on the edge

3. Roll up nice and tight

4.With a sharp serrated knife, cut the rolls down the centre middle in half lengthwise.

6.Overlap the tendril pairs so they are alternating with the overlaps


Save Print
Earl Grey, Sesame and Cassonade Weave Bread
Prep time:  5 hours
Cook time:  30 mins
Total time:  5 hours 30 mins
 
Ingredients
  • FOR THE BREAD:
  • 2½ cups or 325 grams all purpose flour
  • ¼ cup or 50 grams white granulated sugar
  • 1 teaspoon white granulated sugar
  • 1 teaspoon table salt
  • 1½ teaspoons traditional active dry yeast
  • 1 cup milk (will be reduced to a little less than a cup of milk)
  • 2 Earl Grey Tea bags
  • 2 fresh eggs room temperature
  • 6 tablespoons softened unsalted butter
  • 1 tablespoon vegetable oil
  • FOR THE FILLING:
  • ½ cup or 113 grams softened unsalted butter
  • ½ cup or 100 grams brown cassonade sugar
  • ⅓ cup or 40 grams toasted sesame seeds
  • GLAZE:
  • 2 tablespoons pure maple syrup
Instructions
  1. In stand mixer bowl with hook attachment, sift flour, sugar and salt and give quick mix (with a whisk)
  2. In small sauce pan, on medium low heat, scald the milk until it forms little bubbles on the side of pan or reaches a temperature of 180 F. Turn heat off and allow to cool to about 110 F or touch with hand. Should be very warm to the touch... but not too hot that it's unbearable to touch
  3. Measure out ½ cup of the warm milk in a bowl and add the yeast and 1 teaspoon white sugar and give quick stir. Set aside and allow to poof (double its size)- about 10 minutes
  4. Drop the 2 Earl Grey tea bags in the remaining warm milk in sauce pan and let steep for 4 minutes. Remove bags and squeeze excess milk
  5. You should be left with about ⅓ cup of Earl Grey infused milk
  6. In stand mixer, still with kneading hook, stir in the Earl Grey infused milk
  7. Then add the milk with yeast and stir - Mixture will look shaggy and ragged. This is okay.
  8. Add the eggs in one at a time while stirring on low- scrape sides and bottom with a spatula a couple times while kneading.
  9. Add the butter in a table spoon at a time. waiting for butter to be incorporated fully before adding the next chunk in - dough will look sticky but keep kneading until the dough looks shiny and smooth
  10. If still dry and not coming together after 2 or 3 minutes, add a teaspoon of water or milk until dough comes together. If opposite issue of too wet, add an extra flour, a tablespoon at a time. You don't want it too sticky like pizza dough nor too taut... refer to pic above.
  11. Continue to knead for 10 minutes until the dough is smooth, shiny and no longer sticky
  12. Form the dough into a ball
  13. Grease with vegetable oil a large bowl until it is lightly covered
  14. Lightly roll the dough around in the greased bowl (Make sure bowl is large enough to accommodate the fact that dough will double in size)
  15. Cover with plastic film and allow to rise in warm area of home for 3 hours.
  16. In the meanwhile make the FILLING
  17. Loosely crush the sesame seeds in a mortar and pestle or zip in blender for a few seconds or put in ziplock and crush with rolling pin. You want a few seeds crushed. Crushing it will release some lovely nutty flavour
  18. Mix with spatula in bowl, the softened ½ cup butter and ½ cup brown cassonade until well blended- set aside
  19. ASSEMBLING THE WEAVE:
  20. *There are a series of pictures above which will help with the assembly
  21. After the first rise, take dough and cut into 4 equal pieces
  22. Roll each piece into flat oval shapes - about 12 inches in diameter
  23. Take about a quarter of the filling and spread leaving about half an inch on the edge
  24. Roll up all the way
  25. Do this for the rest of the dough sections
  26. Pop in refrigerator for 15 minutes on baking tray lined with parchment paper covered with plastic (Optional- I find this step helps keep the dough a bit firm when shaping)
  27. With a sharp serrated knife, cut the rolls down the centre middle in half lengthwise.
  28. Create a "tic tac toe" grid with the tendrils (refer to pic)
  29. Overlap the tendril pairs so they are alternating with the overlaps (see pic)
  30. Take all the tendril pairs that are on the underneath another tendril pair to overlap the pair that is clockwise to it. (refer to pic)
  31. Carefully tuck the tendril ends under the loaf
  32. Put on a large baking tray lined with parchment with at least 4 inches on all sides (to allow for the second rise and the spread during bake)
  33. Cover with a damp tea towel for second rise, place in warm part of house- about 1½ hours
  34. BAKING THE WEAVE:
  35. Preheat oven to 375 F
  36. Remove tea towel and bake for 20 minutes or until somewhat browned on the top
  37. Remove from oven and cover loosely with sheet of foil and bake for another 15-18 minutes
  38. Test bread by pressing close to centre...should be firm
  39. Immediately brush maple syrup all over bread
  40. NOTES:
  41. *When yeast doesn't poof, it usually means the milk was too warm or too cold. If you don't have a food thermometer, test by touching water. It should be very warm but not so hot that your fingers can't take it.
  42. Another issue could be the yeast has expired or simply died.
  43. If you only have raw sesame seeds, toast on pan over medium high heat for about 3 minutes stirring occasionally.
  44. This weave bread is best consumed within a couple days, however can be kept up to 5 days at room temperature wrapped with plastic
  45. Can also be frozen for about a month
3.5.3229


Filed Under: Breads, Breakfast, Brioche, Holidays, Spring, This Korean Bakes

Mandarin Crème Pâtissière filled Donuts

December 20, 2017 By stemsandforks Leave a Comment

Life was not easy for my family growing up. We were new to the country (Canada), with barely any money, English or knowledge of what the western culture was like. The language, the food, the shopping and the holidays were all so very different including Christmas-something that wasn’t celebrated by Koreans back in the 70’s. Christmas of course, the most revered and celebrated by the western world was hard to avoid for my folks. It was everywhere, the malls, the streets, TV.  In fact my first memory of Christmas was when I was 4 years old. It was of my parents trying to figure out how to erect and decorate a Christmas tree for the very first time. All the meanwhile my father summarizing the Gospel of Luke and explaining how it was a lovely ‘fairytale’ invented by a group of people called ‘Christians’ and how Santa Claus was created to scare kids to behave. I distinctly remember him declaring, “So that means I’m Santa Claus. And if you obey me, you will get presents”. Yeah you could say my dad was the ultimate party pooper or just really fatigued and lost in this brave new world. 

By the time I was 10, our family skipped the tree and barely had anything festive in the home. Okay maybe a poinsettia or two. But that was it. Christmas eve dinner was usually at a Japanese or Korean restaurant where we exchanged gifts still in their original plastic bags. I shake my head in disbelief as I write this. But this was my family. My parents were too busy working hard to stay afloat to support three very sprightly growing girls so holidays were definitely not a priority. My family had plenty of spirit just no Christmas spirit. By the time I hit high school, we Shins decided to eschew Christmas. At the time it didn’t concern us. Until I had kids of my own. It was then I realized I had few Christmas memories.

Once I had kids, I  found myself doing the complete opposite of what my dad did. I was buying elf on the shelf and shifting the creepy little doll around every night and looking forward to my kids look of bewilderment and excitement (and maybe a bit of fear! Lol) when they’d see Elf had moved while they were sleeping. Telling my kids lovingly about how Santa watches kids all over the world to see who’s been naughty or nice. I even went as far as telling my 10 year old that her friends were liars when they told her Santa was bogus. And of course I began to bake with my kids… Cookies with a diy sprinkle buffet became a tradition (and a nightmare for vacuuming). And opening WRAPPED presents, wearing crowns at Christmas dinner and dancing in front of the Christmas tree with Feliz Navidad blaring. 

So I lied. I do have Christmas memories. I’ve made them for 11 years and I’ll continue to make them for as long as I’m able and I hope you can too. 

Wishing you all a very Happy Holiday. Best wishes for health and happiness in 2018. xo

Bon app! 

Mandarin Crème Pâtissière filled Donut TOWER
2017-12-20 19:41:07
Serves 30
A delicious cream filled donut perfect for a weekend or holiday snack or breakfast. This recipe yields 60 donuts so feel free to reduce the quantity.
Write a review
Save Recipe
Print
INGREDIENTS FOR THE DOUGH
  1. 6 teaspoons active dry yeast
  2. 1 1/2 cup milk (100 degrees to 110 degrees)
  3. 200 g or 1 cup + 3 teaspoons white granulated sugar
  4. 880 g or 6 3/4 cups all-purpose flour
  5. 6 large eggs room temperature
  6. 85 g or 6 tablespoons unsalted butter, room temperature
  7. 3 teaspoons salt
  8. 8 cups vegetable oil
INGREDIENTS FOR THE MANDARIN PASTRY CREAM
  1. 650 ml of freshly squeezed mandarins (about 15)
  2. 100 ml 35% cream
  3. 8 egg yolks
  4. 200 g or 1 cup of granulated white sugar
  5. Zest of 3 tangerines
  6. 60 g or 1/2 cup plus 1 table spoon of corn starch
  7. 1 teaspoon salt
  8. 200 g or 3/4 cup plus 2 tablespoons of unsalted butter cut into cubes
  9. 2 tablespoons Grand Marnier (optional)
FOR THE SUGAR DUSTING
  1. 300 g or 1 1/2 cups granulated white sugar
INSTRUCTIONS FOR THE DOUGH
  1. Warm milk to a simmer in small sauce pan until it reaches a heat of about 110F which is basically very warm but not uncomfortably warm when touched. Remove from heat and add the 3 teaspoons of sugar and yeast. Allow to get foamy and puff about 10 minutes or so
  2. Sift flour into stand mixer bowl with kneading hook attachment.
  3. Add the eggs, sugar (dough qty) and mix until batter is a bit shaggy...add the butter, and salt.
  4. Add the yeast milk mix and knead for about 8 minutes or until the dough has come together and is soft, smooth and bounces back when poked.- add spoon of milk if too dry or flour if too wet and knead again
  5. Put the dough in a lightly oiled bowl, cover with plastic and allow to rise for about 2 hours in a warm area of home.
  6. Once the dough has doubled, cut into thirds. (***unless you have already scaled this recipe back to make less donuts then there is no need to cut into thirds)
  7. Roll out each third onto a lightly floured surface to about 1/4 inch thickness.
  8. Use a 2 1/2 inch round biscuit/cookie cutter and cut about 20 rounds.
  9. Reuse scraps by re rolling and cutting (only re roll once, discard remaining dough)
  10. Place donut pucks onto trays lined with parchment paper and cover with a moist kitchen cloth and allow for the second rise about 20-30 minutes room temperature.
  11. Put vegetable oil in a large saucepan over medium heat, (370 degrees on a candy thermometer - If you don't have one..get one!) drop about 5 donuts in with a slotted spoon.(cook 5 at a time)
  12. Fry each side about 40-50 seconds. If oil is too hot the dough will turn a dark brown, turn down heat. You want to fry until golden.
  13. Use the slotted spoon to transfer the donuts to a baking sheet lined with paper towel.
  14. Roll in sugar while the donuts are still warm and transfer to a baking sheet with parchment paper.
  15. To save time, I drop the next 5 donuts into the oil by the time I'm sugaring the 3rd donut.
INSTRUCTIONS FOR THE MANDARIN CREAM PASTY
  1. In a medium sauce pan, simmer the mandarin juice and cream
  2. In stand mixer, with the paddle attachment, mix the egg yolks, sugar, salt and mandarin zest until light smooth and pale about 3 minutes
  3. Add the cornstarch in slowly and mix until smooth
  4. Pour about half the warm Mandarin/cream mixture into the egg/sugar mixture while the paddle is stirring
  5. Stir until combined. Scrape the stand mixer bowl
  6. Transfer to the medium sauce pan with the rest of the Mandarin/cream and whisk constantly on medium heat until it starts to boil.
  7. Once it starts to bubble, reduce heat to medium low and whisk continuously for another minute
  8. Remove from heat and add the butter cubes and Grand Marnier (Optional)
  9. Stir till butter is fully incorporated.
  10. Pour pastry cream through a sieve onto a tray lined with parchment paper.
  11. Cover with plastic wrap pressing against the pastry cream so no skin forms
  12. Refrigerate until ready to use
  13. When ready to use, give the pastry cream a quick low speed mix with the paddle attachment to get it pipe-able and smooth to use
PIPING DONUTS
  1. Use a skewer or better yet, a chopstick to make a hole in the donuts
  2. Fill a piping bag with the mandarin pastry cream with a #806 or #4 tip or even cutting out a small1/2 cm hole in a strong ziplock baggie can work
  3. Pipe cream into donuts
  4. You're ready to stack!
Notes
  1. *******PLEASE NOTE THIS RECIPE IS FOR A TOWER OF DONUTS!!! To make a reasonable amount for a family of 4-5 people, use only a third of the ingredients here to yield about 20 donuts
  2. Donuts should be eaten the same day but can be stored in an air tight container for up to 2 days in the fridge.
Adapted from Naomi Robinson-Bakers Royale (Dough only)
STEMS & FORKS https://www.stemsandforks.com/

Filed Under: Donuts, Family Favorites, French, Holidays

Rolled Sugar Cookies with Lemon Glaze Icing

December 7, 2017 By stemsandforks Leave a Comment


 I have been accused many times of being a cookie monster. Without any exaggeration, I can quite easily consume a dozen or so cookies in one sitting. I can see my family and friends nodding their heads right now. Honestly, cookies are so deceiving. They’re presented as cute little entities that are about 3 bite sizes or less. After eating 6 or so, I tell myself, “It’s fine Betty. Cookies are small.” And so I continue eating until someone stops me. Usually it’s my 10 year old daughter demanding I save some for her.

With the holiday season approaching, I don’t hold myself back at all. This is the time to indulge, enjoy and share. Normally I bake about 4 different types of cookies right about now and bake 3 dozen of each. I have rotating baking trays out on my front porch cooling with Roxie my trusty yellow Labrador on the lookout for any pesky and hungry squirrels or birds. She barks as soon as something comes remotely close. Even a blowing leaf. 

…

Read More »

Filed Under: Christmas/Holidays, Cookies, Holidays

Pumpkin and Walnut Bundt Cake

October 3, 2017 By stemsandforks 7 Comments

We are definitely not a turkey family. Well, I personally enjoy a fresh roasted turkey but my husband and kids don’t. Pumpkin however is always a hit with all the Binons. 

This thanksgiving (Canadian) pumpkin is definitely on the menu. I’m thinking of some creative ways of using this wonderful squash asides from a cake or pie. Dumplings…soup…maybe even pumpkin steak? Ha! I’m just thinking out loud right now. Of course if you have any ideas…do let me know. As my daughter always points out…I like “weird” recipes. 

…

Read More »

Filed Under: Autumn, Bundt Cakes, Cakes, Holidays

Sesame Crusted Panettone French Toast with Pear Butter

January 28, 2017 By stemsandforks 1 Comment


Lunar New Year in our family is just another excuse to get together to eat copious amounts of food. Typically we go to my mom’s home, where she cooks up lavish Korean dishes and the entire family eats like gluttons for both lunch and dinner.

Taking this into consideration I skipped on groceries today and figured I’d scrounge something up from the cupboards for breakfast. Maybe cold cereal?

…

Read More »

Filed Under: Holidays, Spreads

Primary Sidebar

Stems & Forks Newsletter

Categories

Archives

Copyright © 2023 · stemsandforks.com · Disclaimer · Terms of Use · Privacy Policy · Contact