• Skip to primary navigation
  • Skip to main content
  • Skip to primary sidebar

STEMS & FORKS

Beautiful musings of flora and fare.

  • Home/Blog
  • About
  • Recipe Index
  • Awards and Accolades
  • Contact
  • Workshops
  • Gallery

berries

Grand Marnier Strawberry Dulce De Leche Pie

July 26, 2019 By stemsandforks Leave a Comment

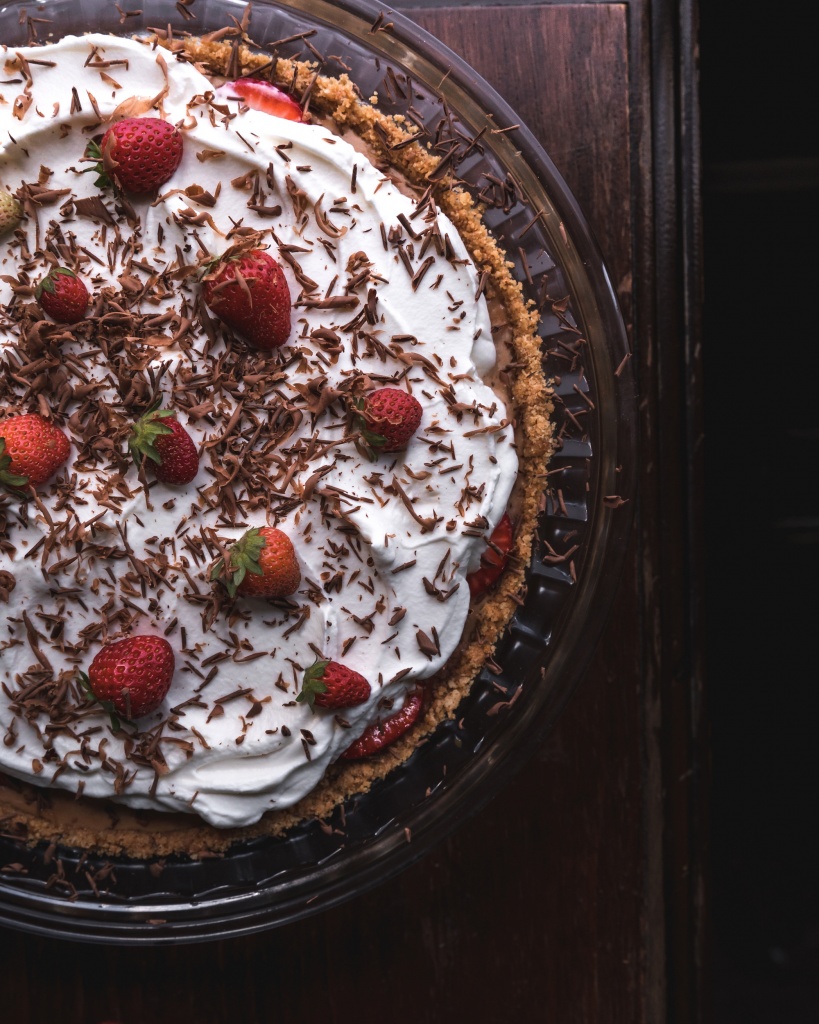
This Post was sponsored by Paderno. All thoughts and opinions are my own. 

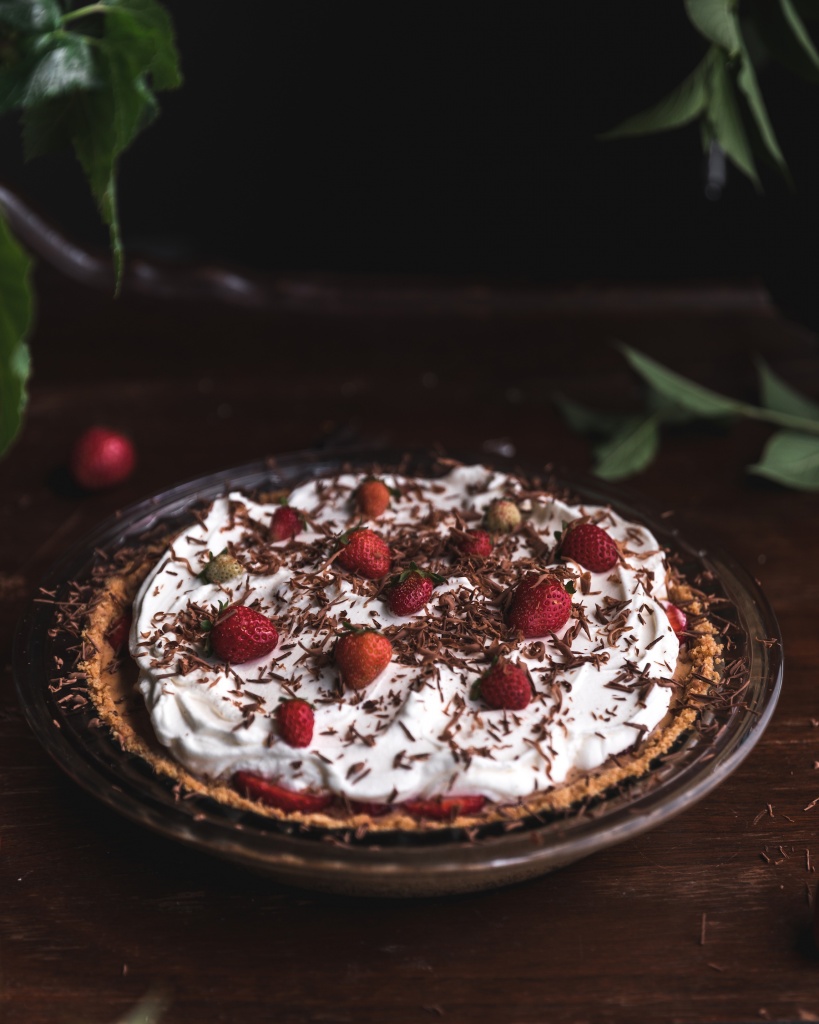
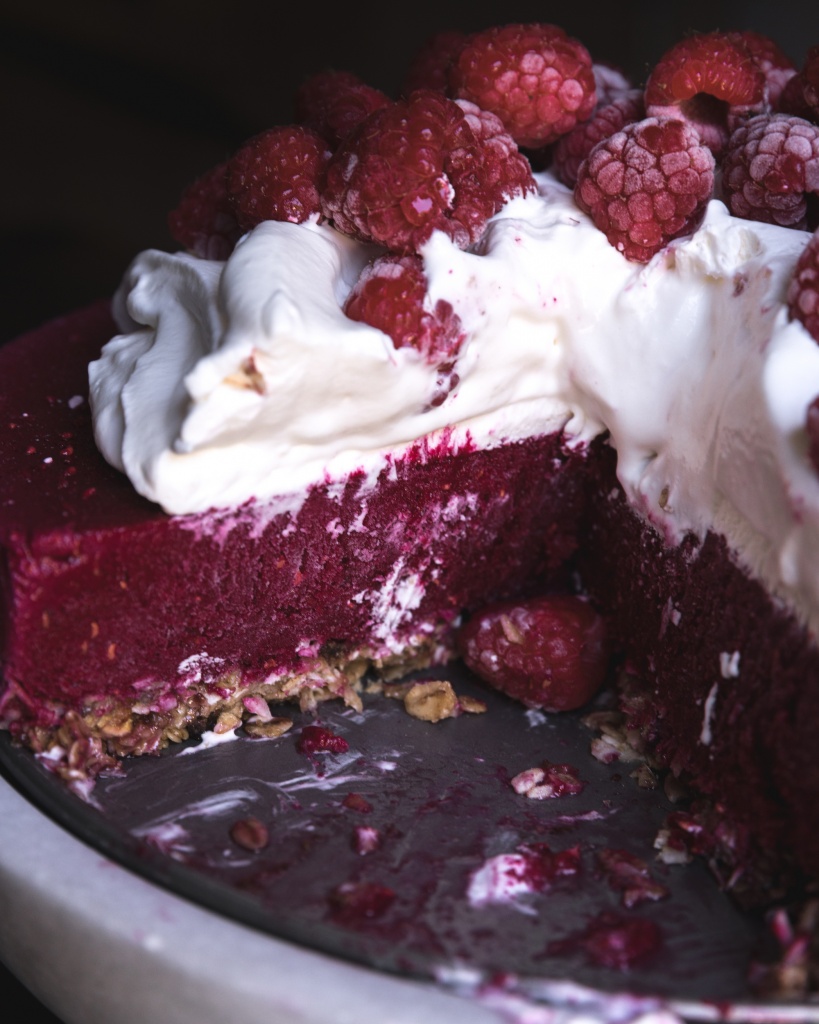
I was tempted to name this pie “Strawboffee.” Doesn’t seem to roll off the tongue as well as Banoffee does it. But in all fairness, I wanted to pay homage to the infamous British pie the Banoffee: a portmanteau of its two main ingredients. Bananas and toffee. 

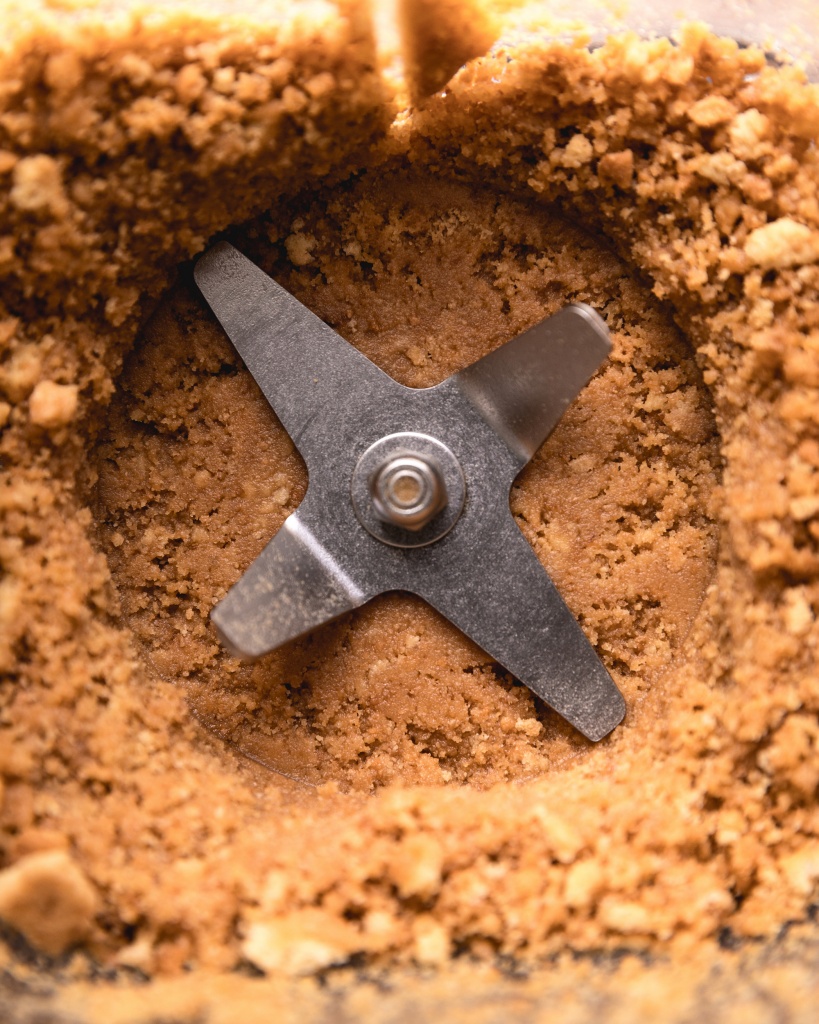
So instead I called it a Strawberry Dulce de Leche Pie which doesn’t do the tart justice. But I couldn’t name it “Crushed digestive cookie crust, layered with a rich dulce de leche, with red strawberries macerated in Grand Marnier, topped up with a massive fluffy cloud of Chantilly cream and shaved chocolate Pie,” now could I?

Paderno Power Blender
Paderno Power Blender 2-Litre jar is shatter-,scratch- and stain-resistant, as well as BPA-free.
Paderno Power Blender’s Vortex Blade Technology is specially-designed to circulate food while blending or chopping for perfect, consistent results

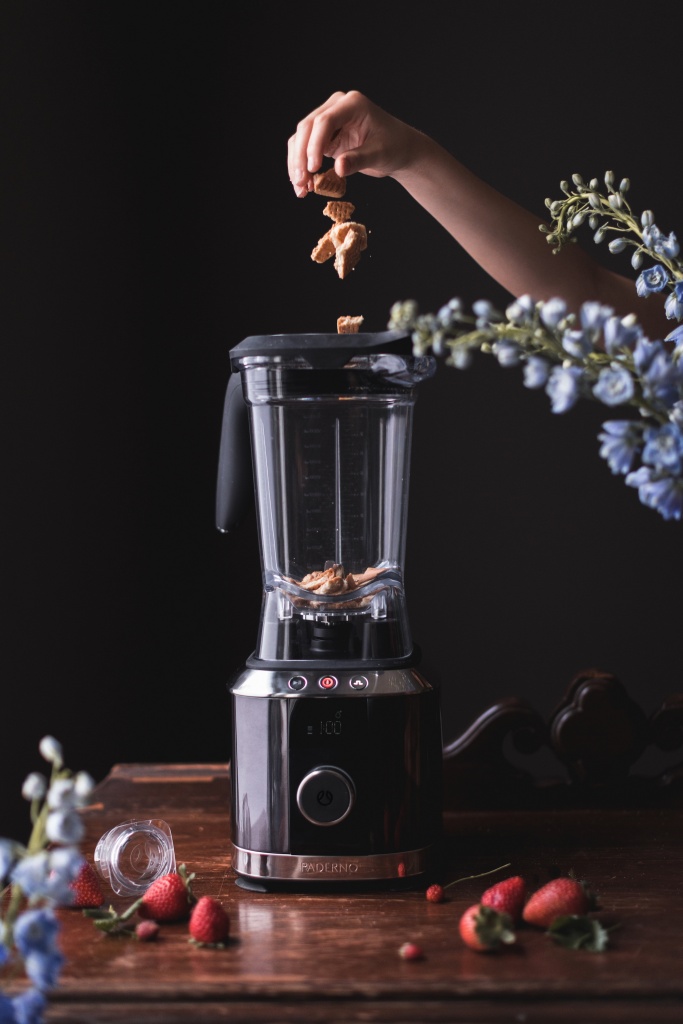
In this recipe, I made the dulce de leche by cooking the milk slowly in a Bain-Marie. Feel free to make your own homemade dulce de leche or boiling down the can of sweetened condensed milk in a pot. Frankly, I have never tried doing the method of boiling the entire can for an hour. I’ve read a few horror stories of it exploding mid boll! If you do boil the can please make sure the can of condensed milk is constantly and fully submerged in the boiling pot of water the entire time it is boiling. About 1 hour to boil is what I read online. The trick I’ve used below is cooking the condensed milk in the oven for an hour and a half in a Bain-Marie, a hot water bath. To slowly and evenly cook the condensed milk into a thick caramel toffee. …

Read More »

Filed Under: berries, Fruit, No Bake, Pies, Tarts Tagged With: banoffee, cake, dulce de leche, Paderno, strawberries, tart

Raspberry Beet Smoothie Cake

July 5, 2019 By stemsandforks Leave a Comment

This post was sponsored by Paderno Kitchenware. All thoughts and opinions are my own.

Paderno’s Power Blender with the Vortex Blade System, Paderno’s Maple Cutting Board and Paderno’s Immersion Blender .

A few years ago, I remembered travelling by train and talking to a few tourists from Germany about the unbearable scorching heat we were experiencing at the time in the south of France. They teased me that the humidity was probably a warm welcome, considering the arctic conditions I must endure back home here in Canada.

That’s right…arctic conditions. 

Paderno’s Richmond Cake Server.

It’s 30 C temperature plus humidity here in Southern Ontario.  Which means I try to keep the oven off, dishwasher running at a minimum and stick my head in the freezer as often as possible. Snacking consists of cold coffee, smoothies, and ice cream. And definitely loads of fresh local berries. 

Which is why this Raspberry Beet Smoothie Cake made with Paderno’s Power Blender is my go-to cake to battle our humid hot summers. I tend to omit the word “beet” when asking the kids if they want some “raspberry smoothie cake topped with whipped cream.” And to be completely honest, you don’t taste beets. Rather a smooth, sweet, crunchy and icy treat. 

Paderno’s Richmond Cake Server.

The beautiful thing about using Paderno’s Power Blender is the Vortex Blade System. It ensures a smooth and consistent result every time. No undesirable chunks of beets that kids may potentially bite into. Instead, a creamy, perfect texture. The blender itself is super easy to use. There are pre-set functions and manual speed settings for smooth operation and accurate controls. There’s even a smoothie function!

…

Read More »

Filed Under: berries, Cakes, No Bake, Sponsored Tagged With: cake, No bake, Paderno, Raspberries, Smoothie, summer

Blackberry Jam filled Donuts

May 17, 2019 By stemsandforks 2 Comments

I recently did a survey on my Instagram feed to see how many of you actually read blog posts…less than 50% read…most of you scroll through pics and just get right down to business with the recipe. So I decided to take a different approach today. Today’s blog post will be short and very sweet. a paragraph to sum up what this donut is. And a paragraph with short notes for handy tips and tricks… Leave a comment if you have time (something everyone said they were short on) and let me know if you prefer this sort of blog post!

ABOUT: This donut is also known as Berliner Pfannkuchen or pączki. Whatever you want call them, these donuts are AMAZING! How could it possibly go wrong when one deep fries brioche dough, cover it with sugar then fill homemade blackberry jam!!!

TIPS/NOTES:

  • Make sure yeast hasn’t expired…I store mine in the freezer !
  • I often get comments/messages that their yeast didn’t poof or their dough didn’t rise…either the water was too hot or not hot enough or the yeast has expired
  • This recipe calls for 1 tablespoon of yeast. I have tested this recipe with 2 teaspoons and 2.5 teaspoons and Ive decided that 1 tablespoon is best for the fluffiest donuts…If you’re curious to know more about this yeast testing…feel free to email me.
  • This is a sticky dough…Don’t be tempted to keep adding flour.
  • After kneading and the first rise, let it rest overnight in the fridge…makes dough easier to work with and has time for the flavours to work itself in the dough
  • As well overnight chilling makes for better texture.
  • Dough can be stored in fridge for up to 2 days
  • Donuts need to be eaten same day when fried…I’m confident there will be no leftovers.
  • The jam recipe yields about 1/2 cup of jam-i prefer my donuts with less jam…If you prefer loads of jelly, feel free to double the quantity for the jam!
Dough is almost ready for it’s first rise.
A look inside from one of the smaller donuts
An earlier test version…These didn’t get a second rise once they came out of fridge…You can see they are not as fluffy.


Blackberry Jam Filled Donuts
2019-05-17 16:50:57
Yields 12
Write a review
Save Recipe
Print
Prep Time
14 hr
Cook Time
12 min
Prep Time
14 hr
Cook Time
12 min
INGREDIENTS For the Dough
  1. 1 Tablespoon traditional yeast
  2. 1 teaspoon white granulated sugar (for the yeast)
  3. 1/2 cup milk
  4. 1 teaspoon salt
  5. 455 g or 3 1/2 cups all purpose flour
  6. 50 g or 1/4 cup granulated white sugar
  7. 4 large room temperature eggs
  8. 85 g or 3/8 cup or 6 tablespoons unsalted butter room temperature & cubed
INGREDIENTS For the Blackberry Jam
  1. 340 g or 12 ounces fresh blackberries
  2. 1/2 cup white granulated sugar
  3. 2 tablespoons lemon juice
  4. 1 tablespoon cornstarch
INGREDIENTS for Frying/Finishing touches
  1. 6-7 cups of vegetable or light oil
  2. 300 g or 1 1/2 cups granulated sugar for dusting the donuts
  3. 6 oz or 170 grams = about 24 blackberries to plug the holes
INSTRUCTIONS For the Jam
  1. Make the jam while you're waiting for the first proof or when the dough is chilling overnight
  2. In a medium saucepan on medium heat, stir the blackberries, and sugar together.
  3. Mash the berries with a masher
  4. In a small bowl mix 1 tablespoon corn starch and 1 table spoon water together, add to simmering blackberries and stir until it starts to thicken.
  5. Stir and heat for another 15 minutes or until it has thickened (will thicken more when cooled)
  6. Remove from heat and run through fine sieve to remove the seeds
  7. Set aside to cool - add the lemon juice then cover and store in fridge overnight
INSTRUCTIONS For the Dough
  1. In a small bowl, mix 1 teaspoon white sugar and 1 tablespoon yeast, set aside.
  2. In small saucepan, warm up 1/2 cup milk to a simmer until it reaches 110F (not too lukewarm but not to hot to touch- just use a thermometer !)
  3. Pour over the sugar/yeast and stir. Set aside and allow to poof about 8 minutes
  4. In bowl, whisk together the flour, salt, and 1/4 cup sugar
  5. In stand mixer bowl with paddle attachment, beat the 4 eggs, then add the poofed yeast/milk mix
  6. On low, beat in the flour mix-will look shaggy
  7. Swap out the paddle to the kneading hook and knead on medium speed for 2 minutes until it forms into a large sticky ball like form-scrape down sides with spatula
  8. Add the butter, a cube at a time making sure each cube is well mixed in before adding the next cube of butter (still medium speed)
  9. Drop speed to low and knead for 5 minutes
  10. Dough is ready when it is glossy and somewhat translucent but doesn't tear
  11. Remember this dough is a sticky dough. Refrain from being tempted to add more flour...It will be less sticky after an overnight chill!
  12. Cover your bowl with a damp kitchen towel, leave in warm room for 1 to 1.5 hours or until it has doubled in size
  13. Punch dough down once, cover with plastic and refrigerate overnight
INSTRUCTIONS for prepping the donuts
  1. Cut out 16 or so 4 inch square parchment papers, dust with a bit of flour and place on a couple large trays and set aside
  2. Turn dough out onto lightly floured counter
  3. Roll out dough into a 9.5 inch by 13 inch rectangle, 1/2 inch thick and cut out about a dozen three inch discs with a biscuit/cookie cutter (and maybe a couple smaller donuts from the edge of dough)
  4. (You can take the cut out dough and re-roll 1 more time to get 3 more donuts-note these will not be as nice looking as the original discs)
  5. Transfer all the discs with a non stick food turner (flipper) to the parchment paper squares
  6. Cover completely with a damp thin cheese cloth or plastic making sure the plastic doesn't touch the dough...you can do this by placing small tumblers or shot glasses in between the discs
  7. Place in warm area of home and let rise another 1 hour
  8. If you feel like they are over rising/proofing, then start frying...overproofing will have them smelling like yeast
INSTRUCTIONS for Frying the donuts
  1. Fill a piping bag with the cooled blackberry jam and a small round tip, set aside
  2. Lay out a few paper towels on a baking tray
  3. Pour the 1.5 cups of granulated sugar on a plate ready for donuts to be dusted
  4. Add the vegetable oil to a large heavy bottomed pot or your deep fryer to 350°F - 365°F.
  5. Take the discs of donuts flipping it over with the parchment paper and drop in oil ...Fry 3 at a time...more will alter the temperature of the oil
  6. Fry each side about 2-2.5 minutes or until golden brown and transfer to paper towel with a slotted spoon
  7. Roll in the sugar after about a minute of cooling and set aside on a baking rack or wooden board
  8. Do this to all the donuts
  9. Take a chopstick or something to poke two holes on opposite sides of all the donuts
  10. Gently fill jam on both sides of donut with pastry bag
  11. plug the two sides of the donut holes with a fresh blackberry
  12. Bon app!
Notes
  1. Donuts must be eaten same day as when its been fried.
  2. I tend to like my donuts to have less jam than the typical donut...feel free to double amount of jam (ingredients would double)
Adapted from Brioche dough adapted from The Kitchn
STEMS & FORKS https://www.stemsandforks.com/


Filed Under: berries, Donuts, Family Favorites, Fruit Tagged With: babka, blackberries, brioche, donuts, jam, yeast

Mochi Balls with Fermented Organic Blueberries from Chile

January 18, 2019 By stemsandforks 4 Comments

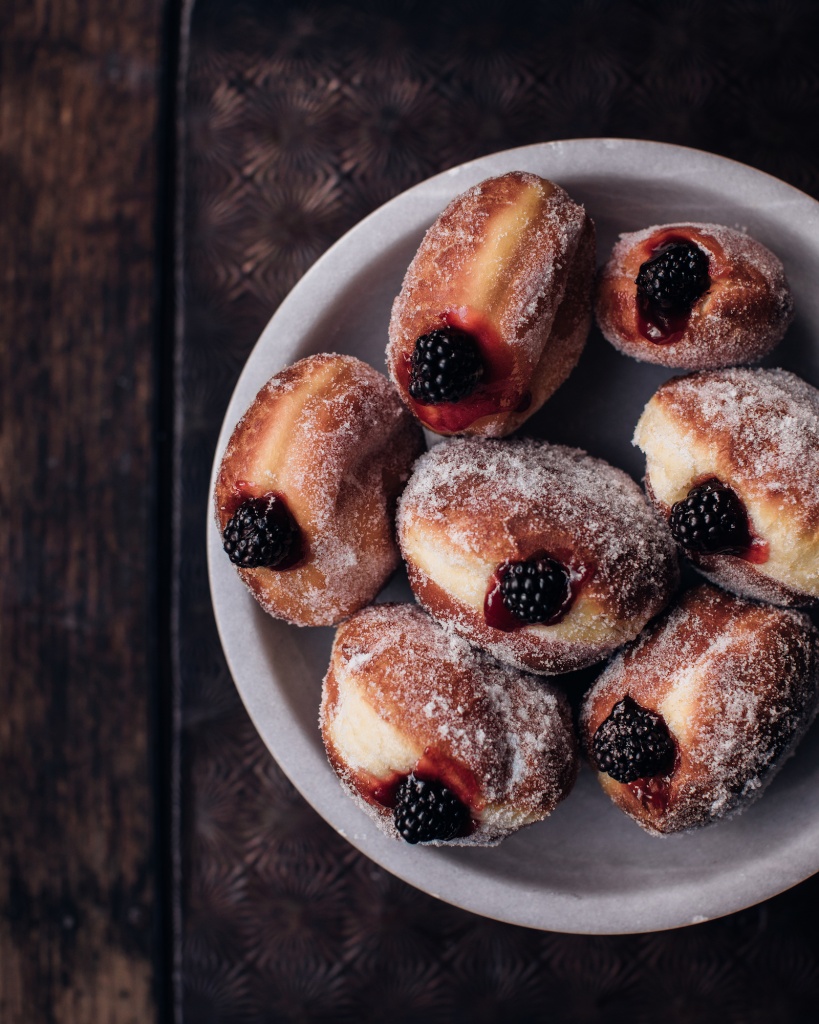
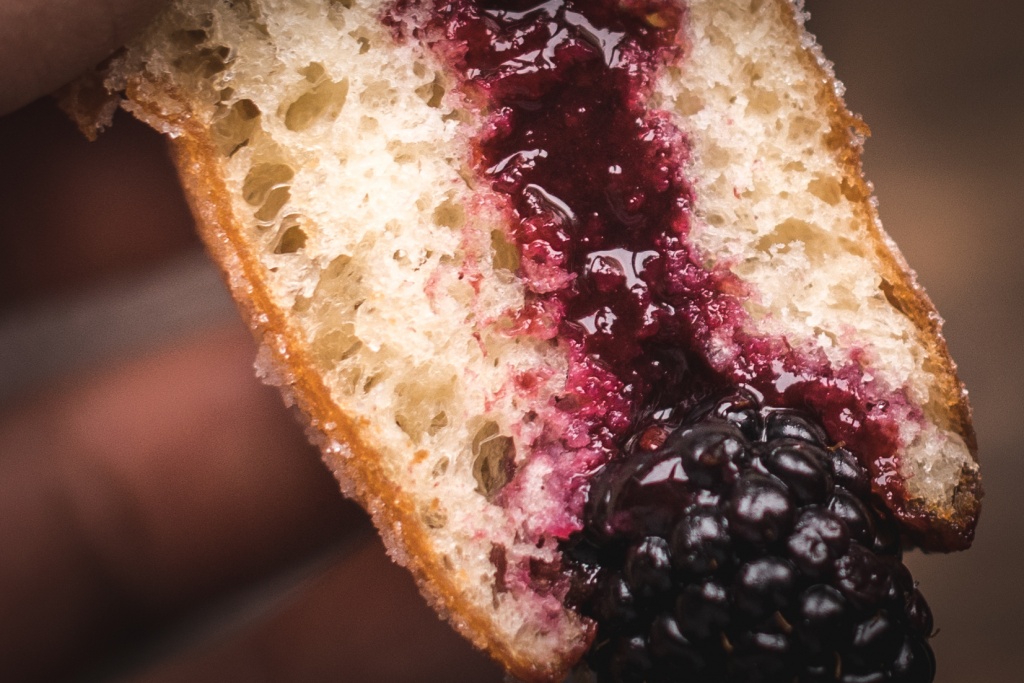
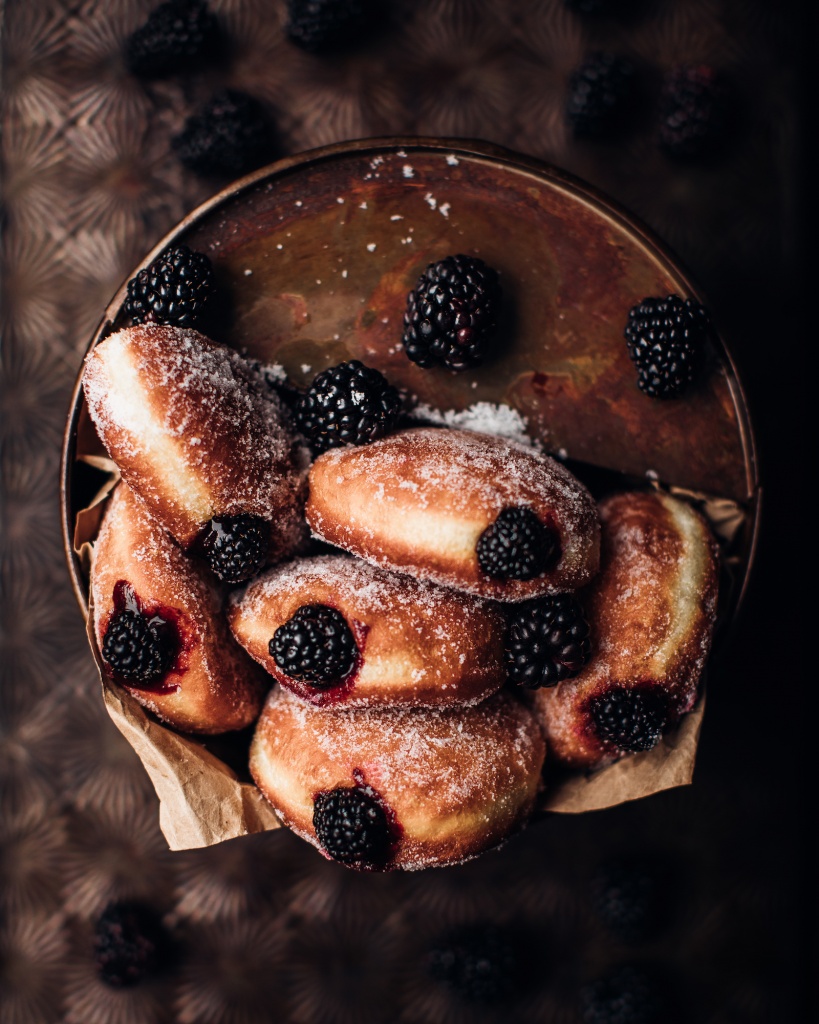
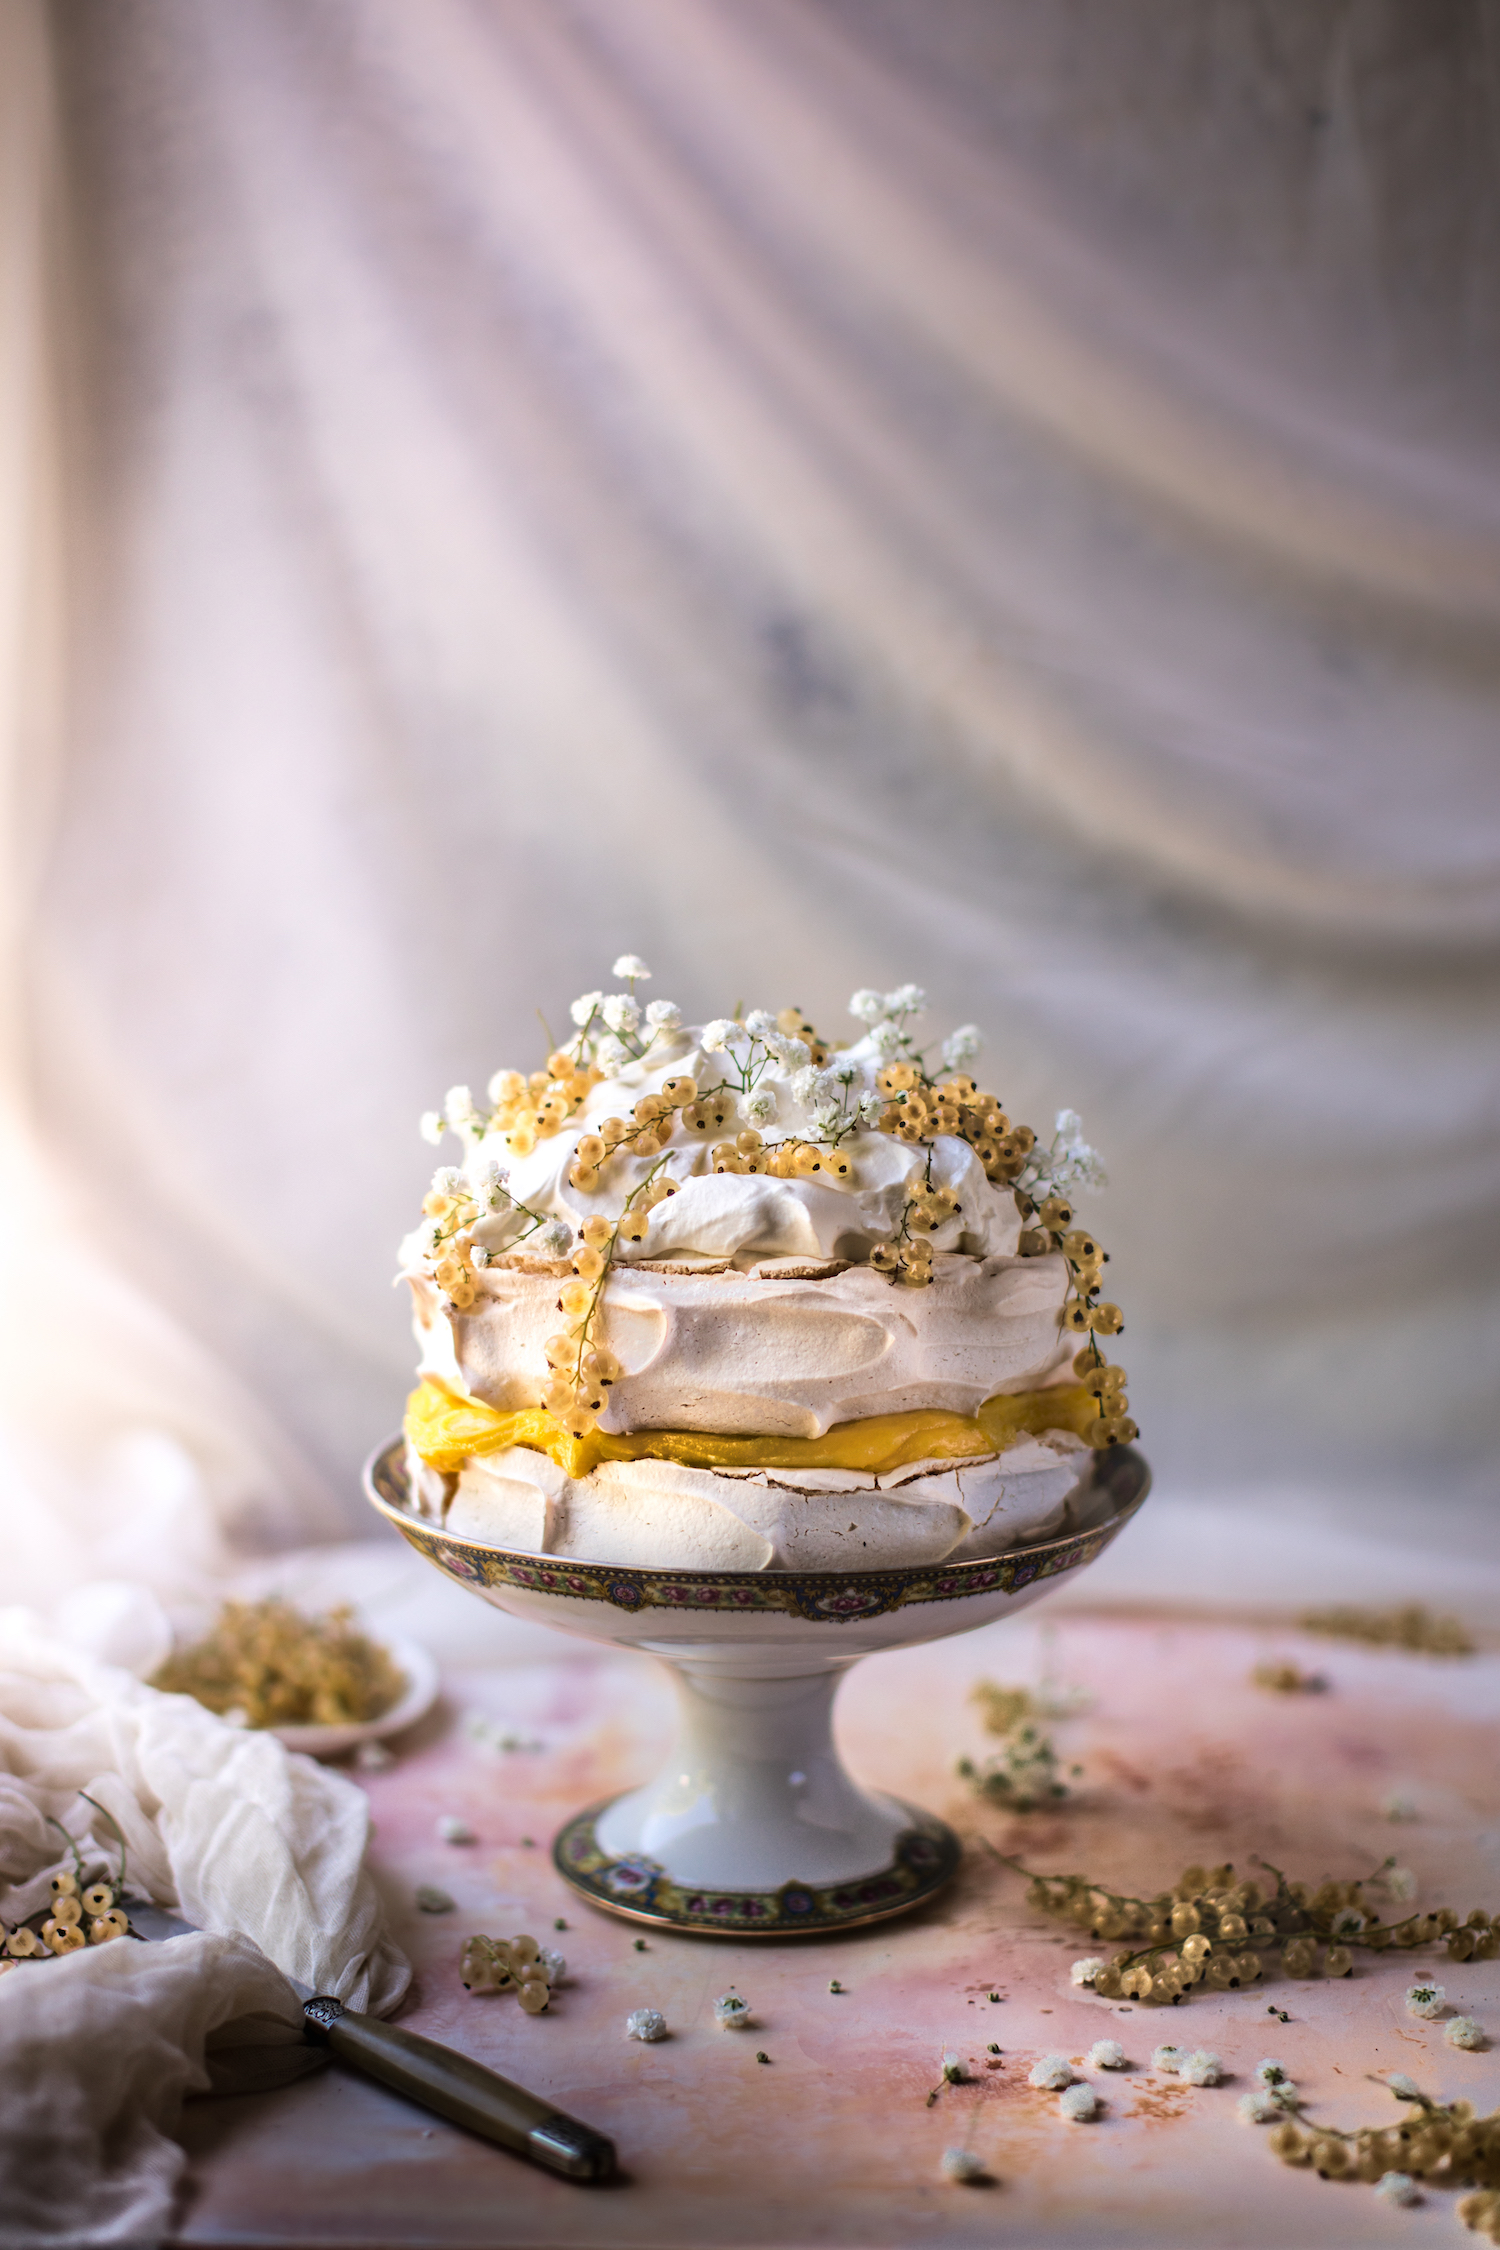
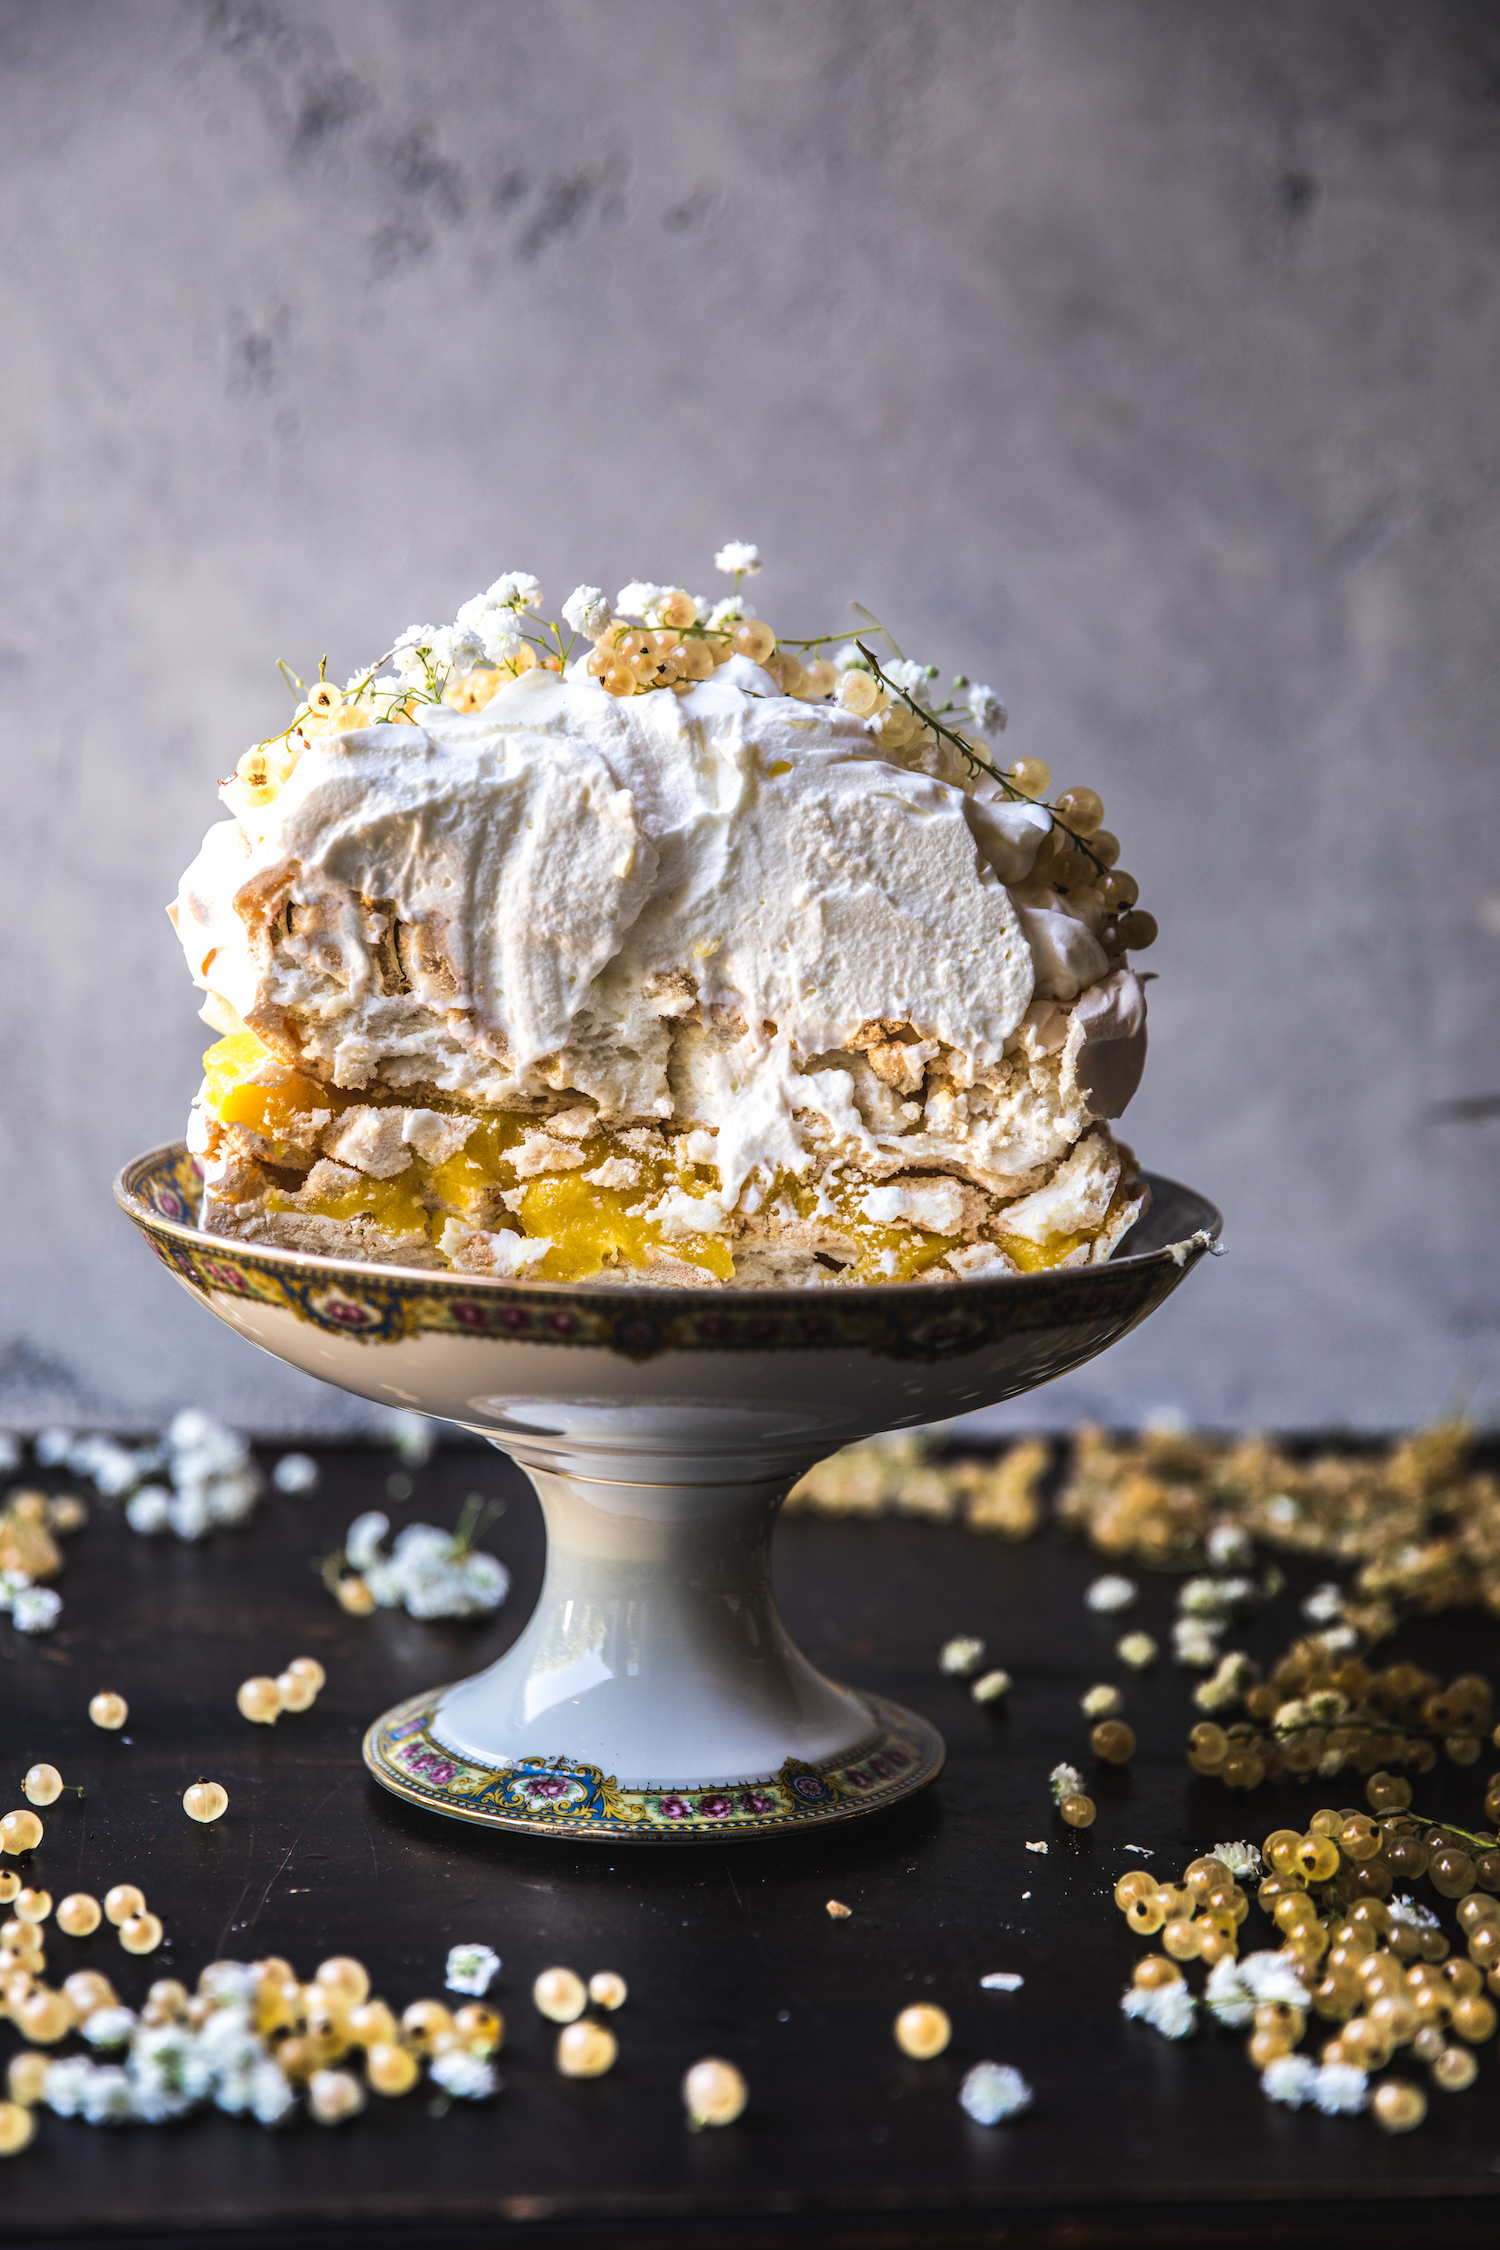
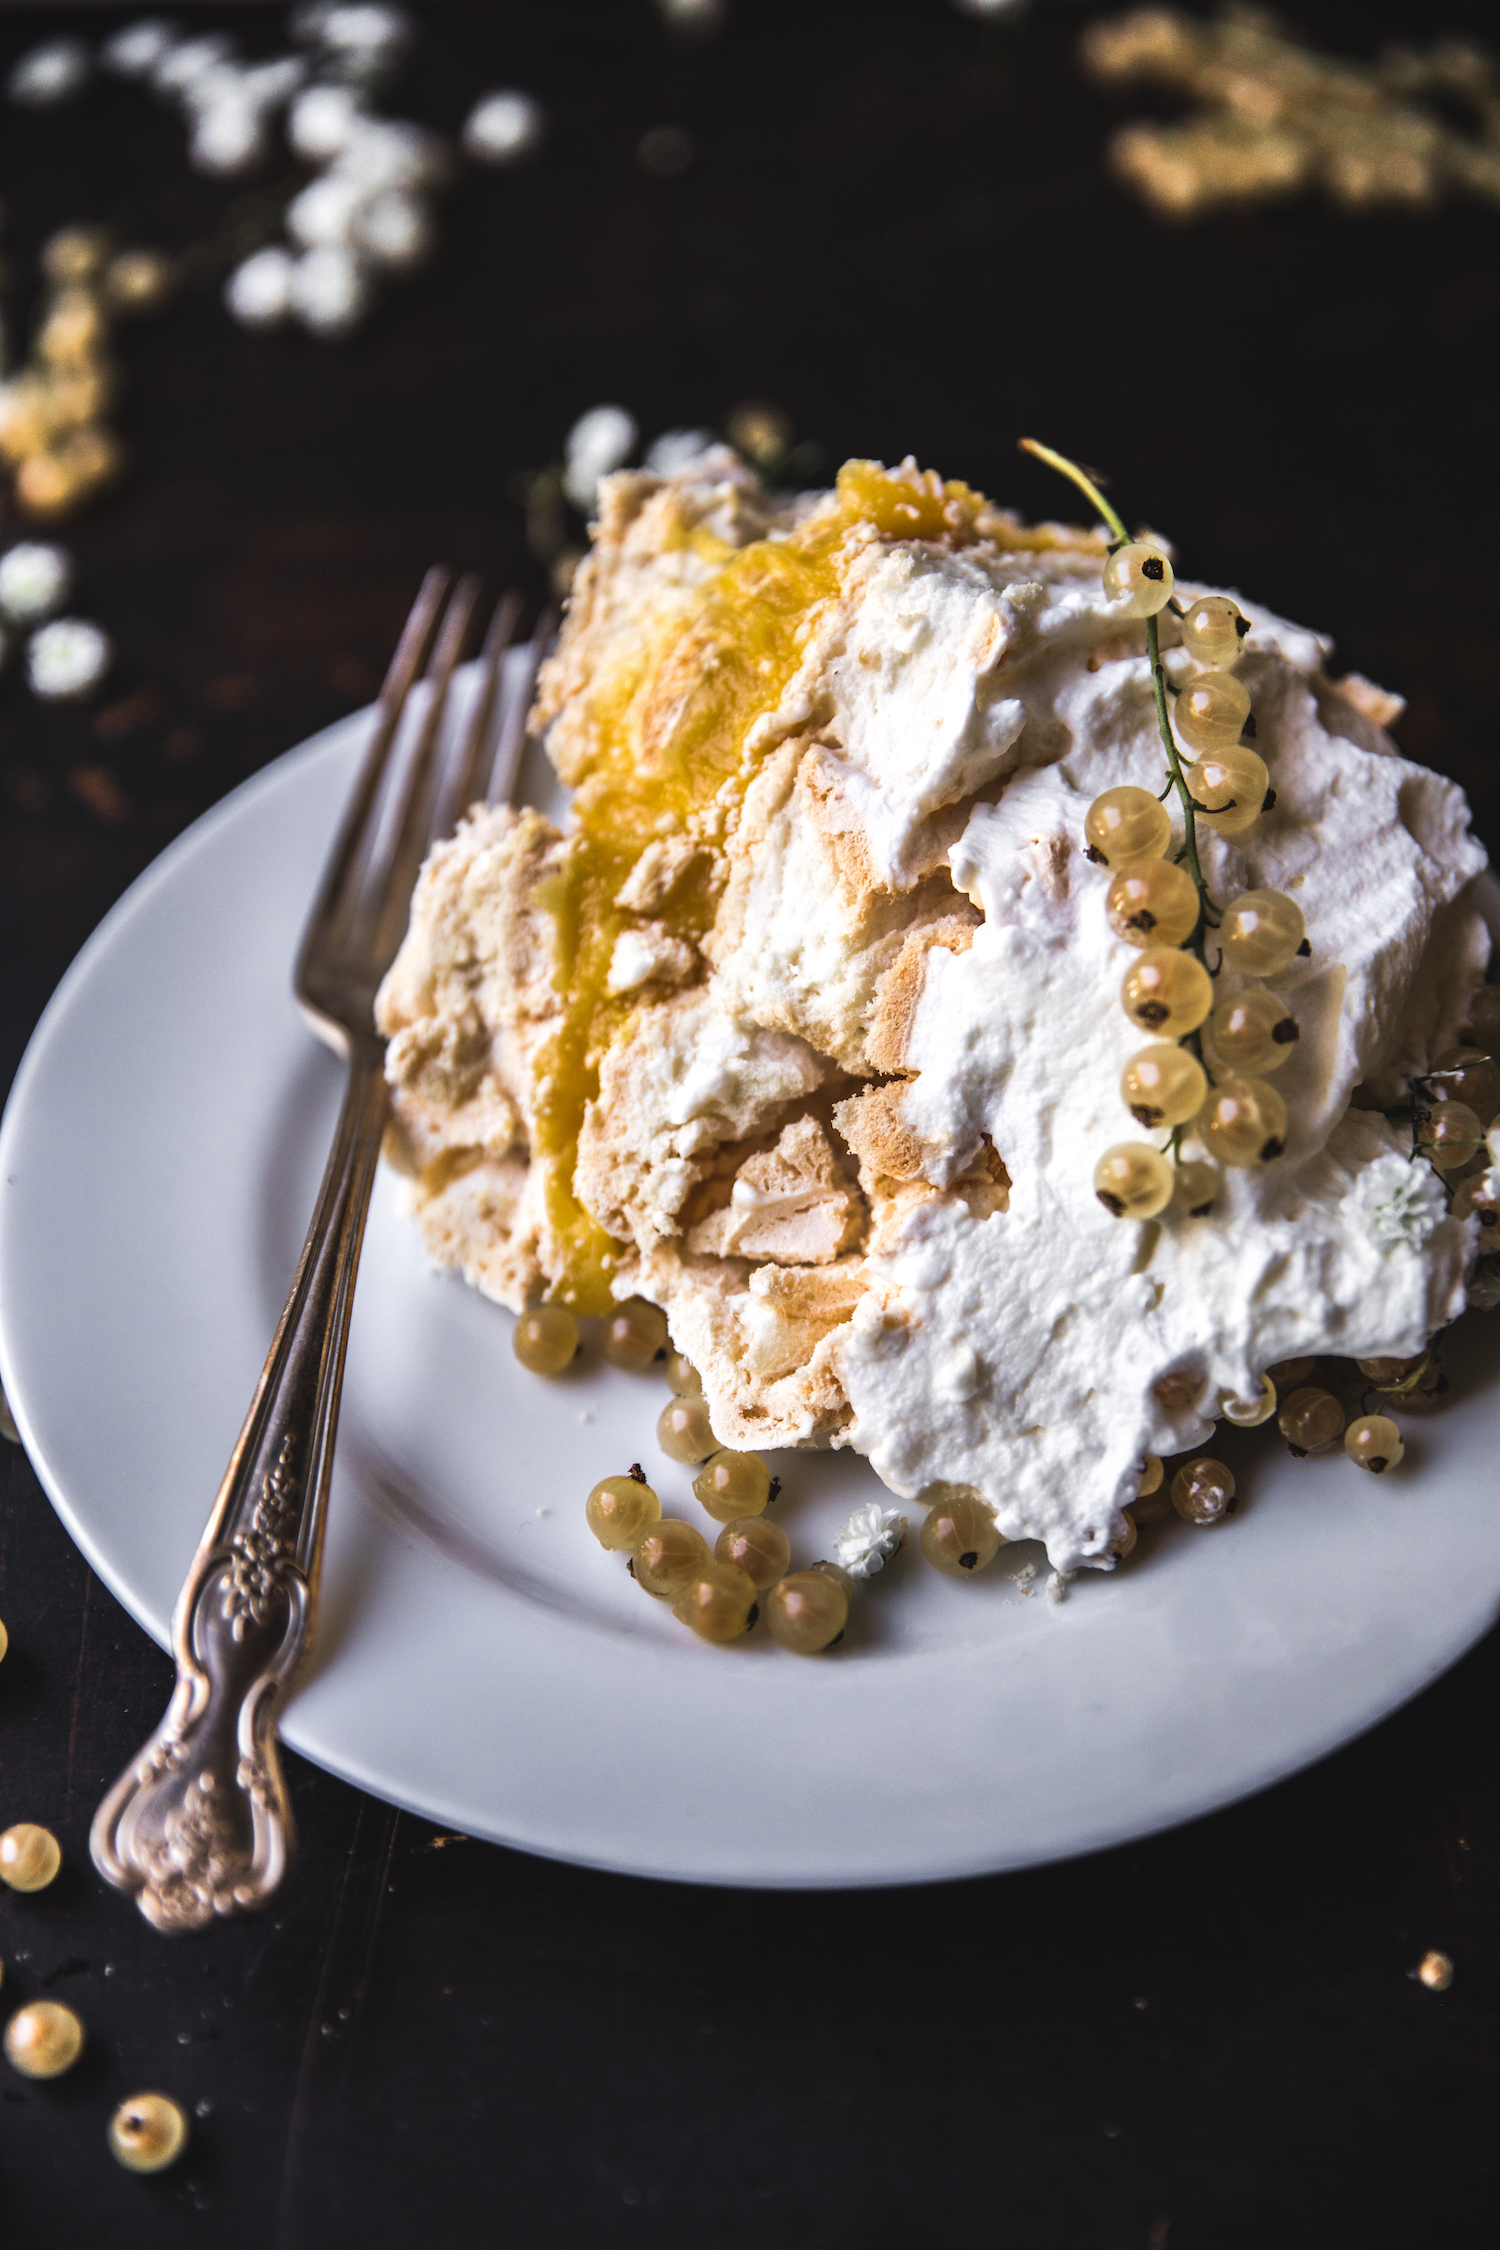
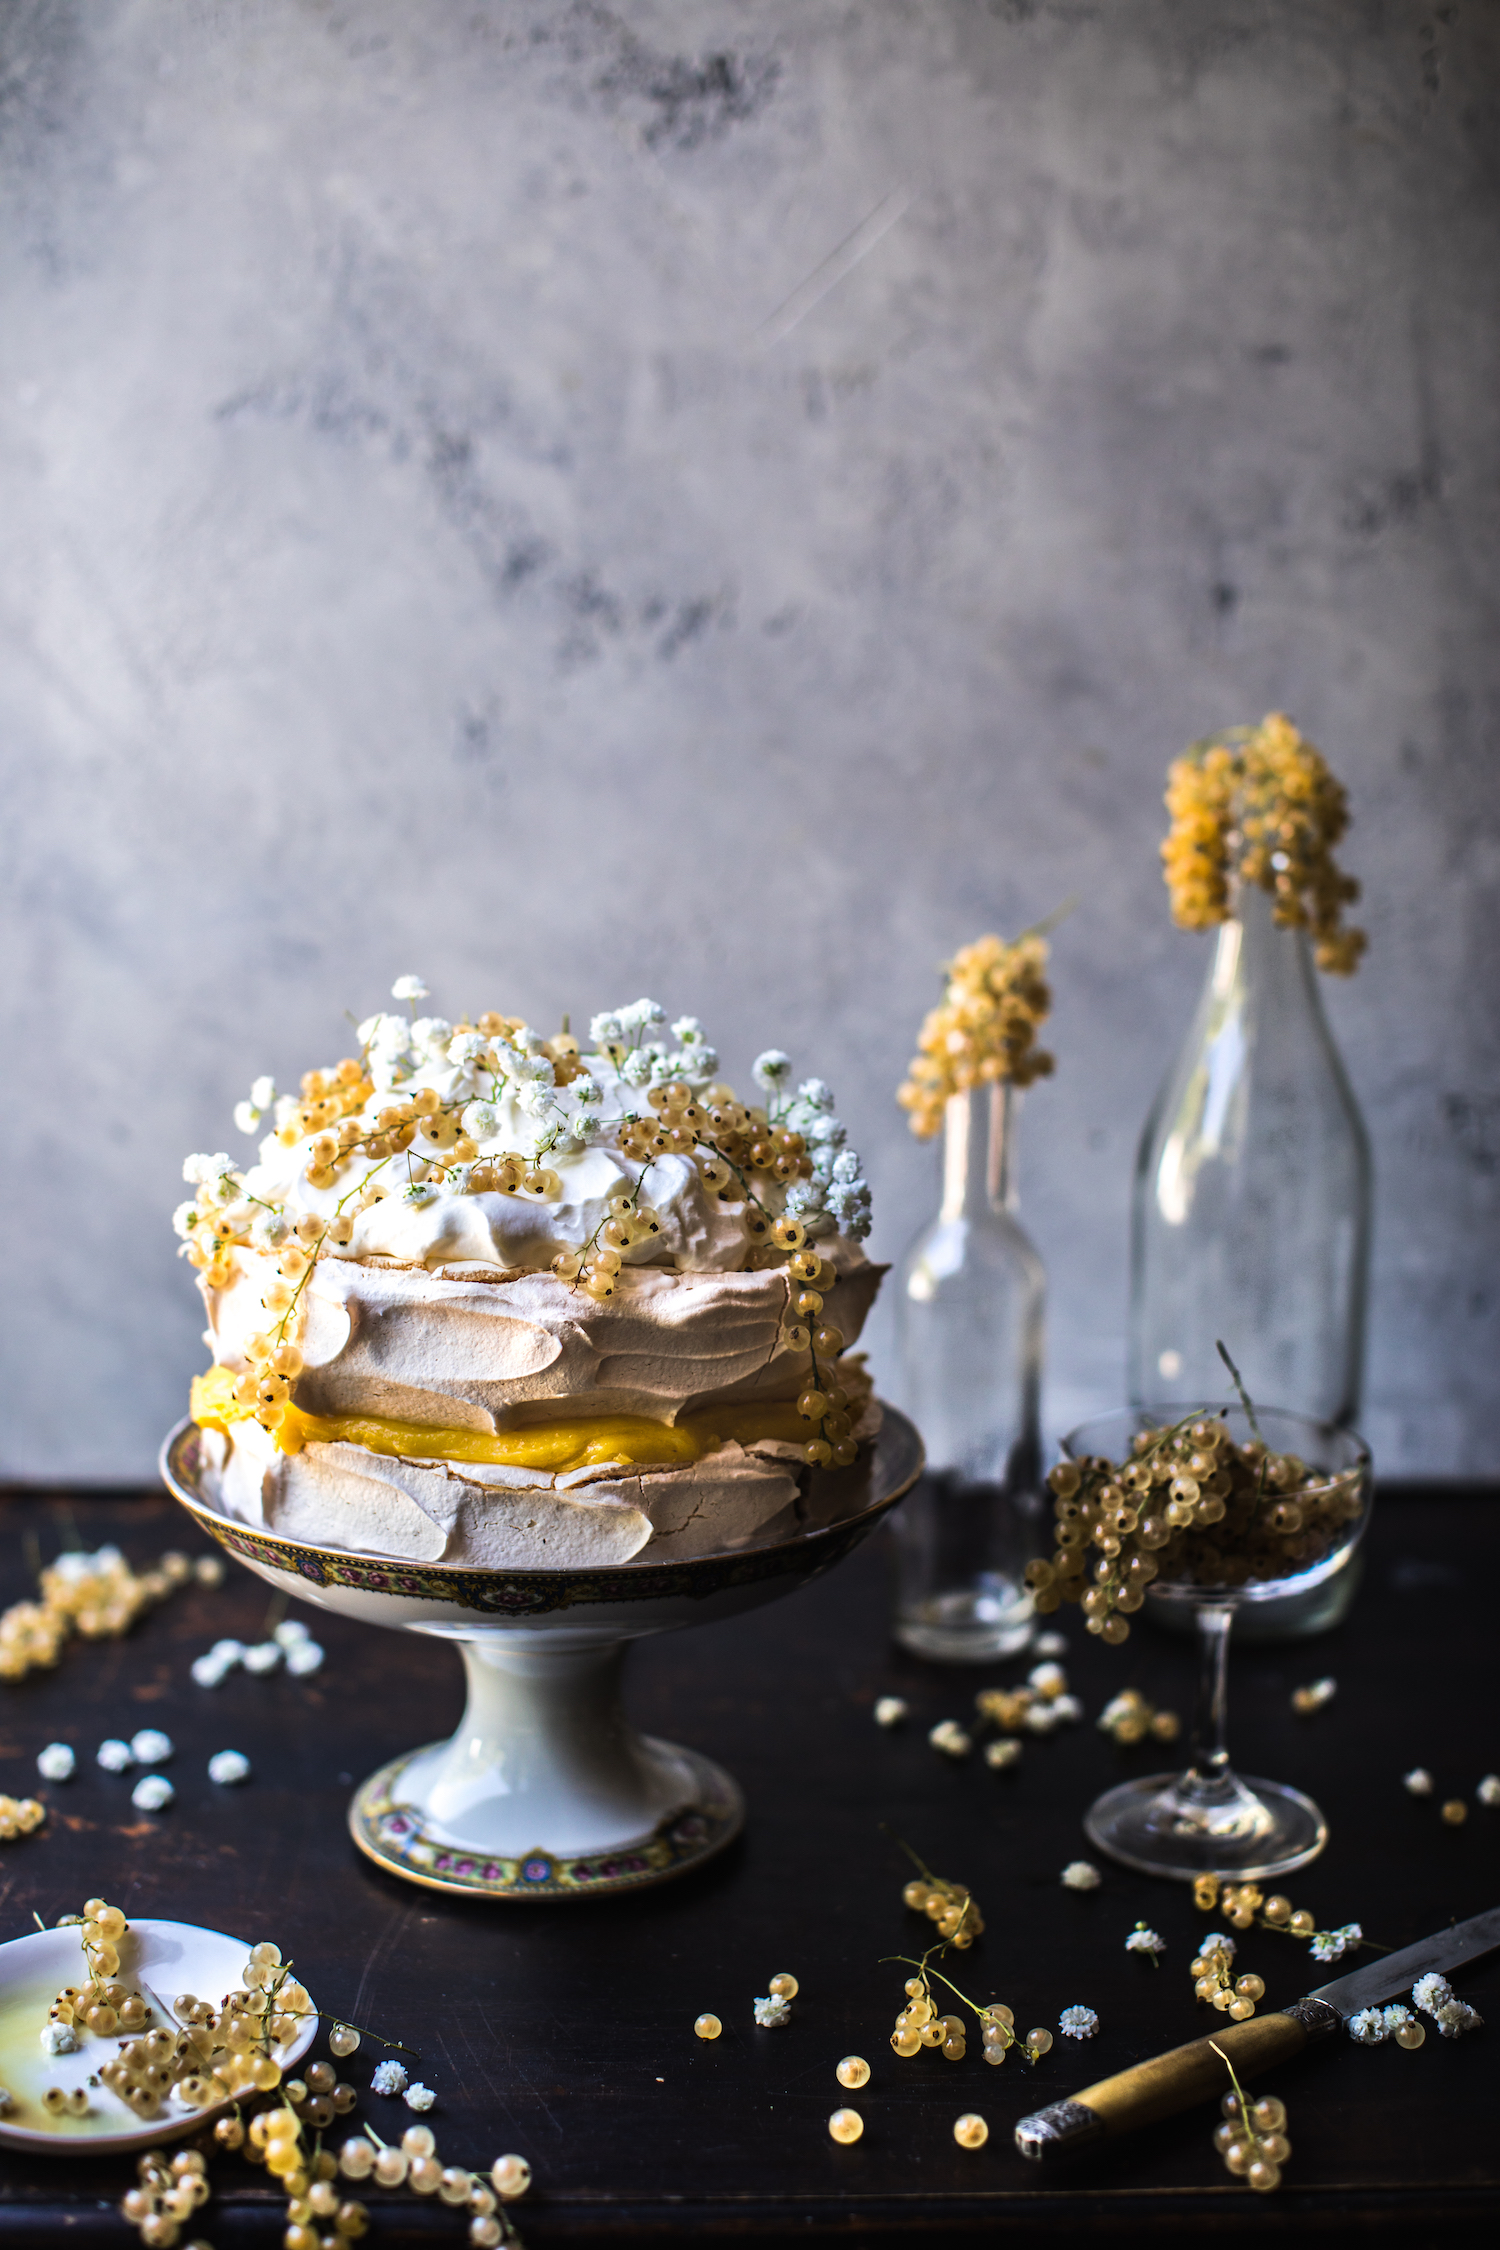
This post was sponsored by Fruits From Chile. All thoughts and opinions are my own
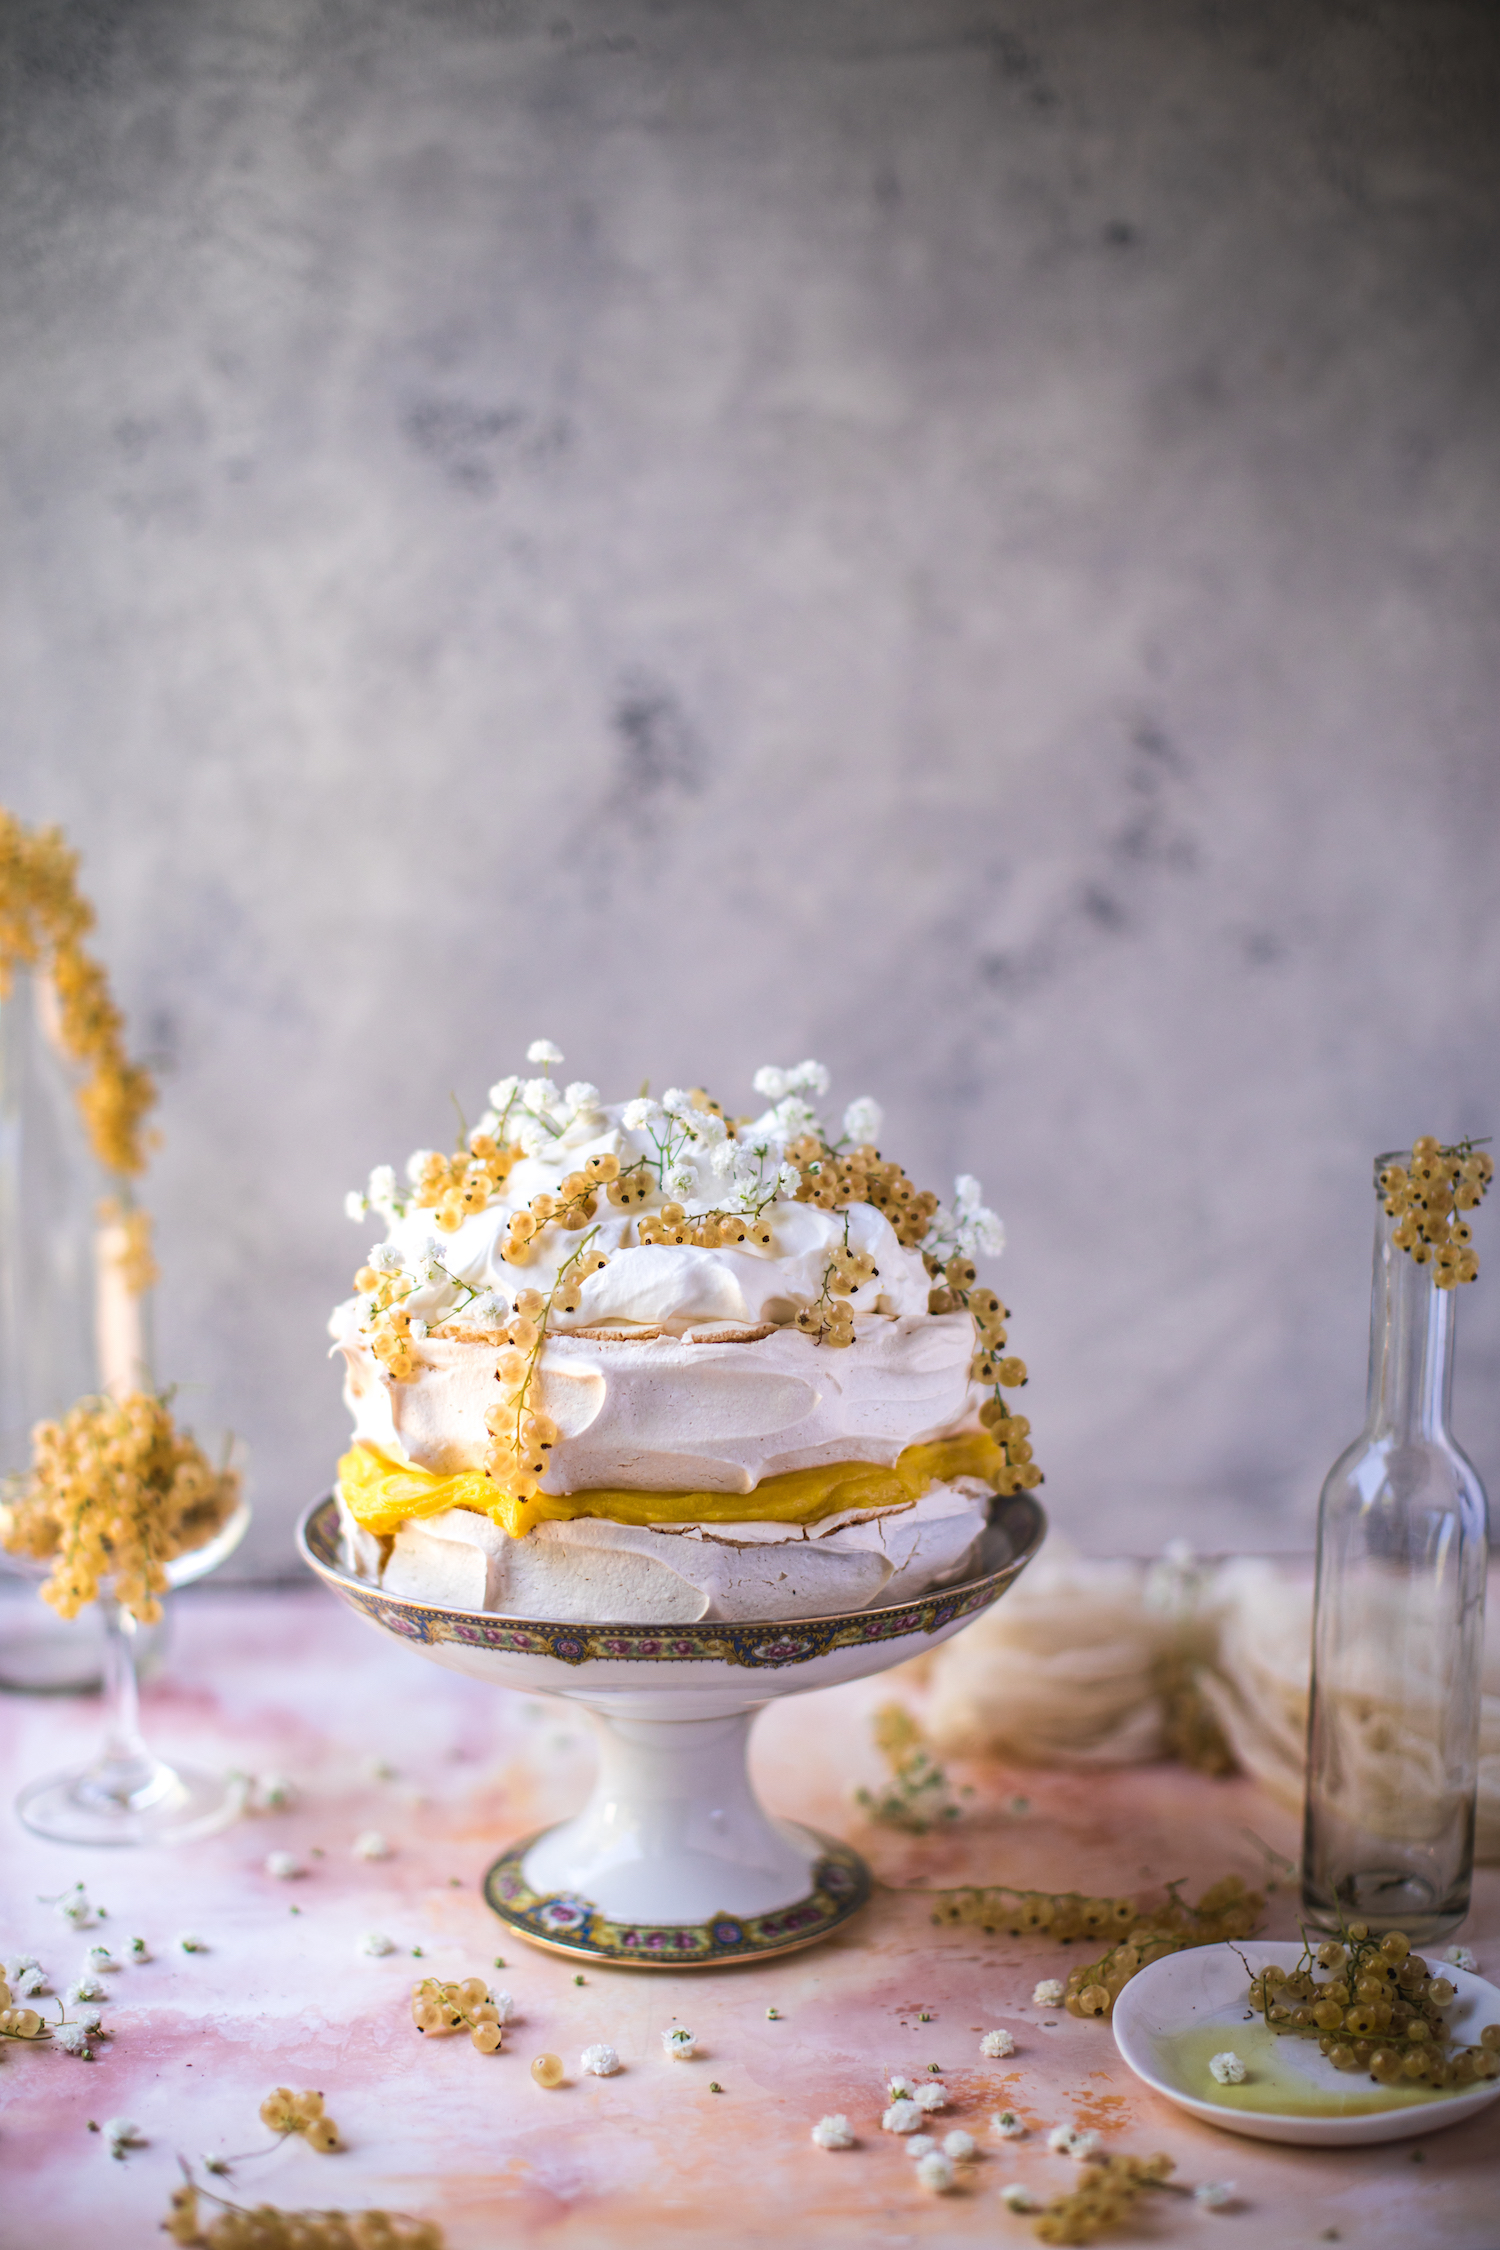
If you didn’t get it right with your new year’s resolutions this month, don’t worry. There’s another new year coming up on February 5th 2019 and you can start anew! With the Lunar new year just around the corner, I thought these Mochi Balls filled with lacto fermented organic Chilean Blueberries would be perfect to ring in the new year and provide a second opportunity to become healthier and kinder to one’s body and mind. 

Lacto-Fermented Foods:

So we all know how naturally fermented foods provide healthy probiotic bacteria. Stuff that’s good for our gut. Studies have shown that the natural probiotics created from fermentation also increases vitamin content thereby boosting our immunity naturally which helps fend off the flu and cold. (source) Consuming fermented foods are also safer to consume than raw as the lactic acids essentially kill off the bad bacteria such as E-Coli. (Source) And it has been proven time and again that improving gut health aids digestion thereby helping promote healthy body weight. It doesn’t stop here. There are a plethora of reasons lacto fermented foods are good for us. 

…

Read More »

Filed Under: berries, Fermented, Fusion, Gluten Free, Holidays, Sponsored, This Korean Bakes

Pavlova with White Currant Curd

July 23, 2018 By stemsandforks 5 Comments

I’ve been promising a Pavlova recipe for ages. And while the web is doused with Pavlova recipes, I thought this white currant curd one might stand out. And stand out she does!  I rigorously researched (meaning I Googled it), and I couldn’t find a white currant Pavlova or for that matter a white currant curd anywhere online. 

It’s been a week since I got back from Paris, France and if you’ve been following along on my Instagram account you’ll know Pierre and I were sick for half the time we were there. Food poisoning from lightly seared tuna during a heatwave. I never seem to learn. (Second time…but the seafood stands look utterly scrumptious!) The worst part about this food poisoning story…I had forced Pierre to eat my leftover tuna (of course before I knew it was tainted), and the Airbnb we stayed at only had one toilet. Merde! 

So why a Pavlova now? Before heading to Paris, Pierre had made a mental list of all the foods he wanted to eat. Meringues were one of them. As a child, Pierre and his parents would make a yearly pilgrimage from Geneva to Paris to do some shopping. Not LV or Chanel, but books and antiques. Very old and special books you’d find in the markets along the Seine river. But for Pierre, it was meringues. He’d dream of those fluffy saccharin-drenched, swirly clouds of egg whites every year as a child. 

It’s been 14 or so years since we’ve both been to France and unfortunately that meringue plan never happened for Pierre. Between jet-lagged kids, food poisoning and my workshop, there were maybe at most, two days that we got to venture out …albeit with recovering woozy bellies. So for two days, we focused on showing the kids Paris’ sights and attractions much to their conspicuous lack of enthusiasm.

In the meanwhile white currant curd Pavlova for Pierre…crispy on the outside and pillowy on the inside sweet meringue discs, sandwiching a sugary but tart curd topped with freshly whipped cream. Sorry Pierre! But French meringue will have to wait. First world problems. C’est la vie!

Bon app!


Save Print
Pavlova with White Currant Curd
Author: Betty Binon
Prep time:  30 mins
Cook time:  1 hour
Total time:  1 hour 30 mins
Serves: 7
 
For a single tier Pavlova, make exactly half the quantity.
Ingredients
  • FOR THE PAVLOVA:
  • 6 Egg whites room temperature
  • pinch of salt
  • 300 grams or 1½ cups super fine white sugar
  • 2 table spoons corn starch
  • 1 teaspoon vanilla extract
  • 1 teaspoon vinegar
  • FOR THE CURD:
  • 10 ounces or 285 grams more or less of fresh white currants stemmed
  • 4 tablespoons water
  • 6 egg yolks
  • 100 grams or ½ cup white sugar
  • 115 grams or ½ cup unsalted butter room temperature cut into cubes
  • FOR THE WHIPPED CREAM
  • 473 ml or 1 pint fresh heavy whipping cream
  • 4 table spoons fine white sugar
  • 1½ teaspoons vanilla extract
Instructions
  1. DIRECTIONS - PAVLOVA:
  2. Preheat oven with rack in middle to 325 F and line a baking sheet with parchment paper and draw two 7 inch circles with a gap of at least 4 inches between the two circles
  3. In a very clean stand mixer with very clean whisk attachment, beat the egg whites and salt on low speed and work your way up gradually to medium high speed until soft peaks are formed
  4. Start adding the sugar on high speed a table spoon at a time until egg whites are stiff and shiny...test by holding bowl upside down...whites shouldn't move. As well, take a bit of meringue and test between fingers...should be smooth with no grittiness left from sugar...takes about 5-7 minutes
  5. Sift the cornstarch over the meringue and whisk again on medium for max 5 seconds
  6. With spatula, gently fold in the vanilla and vinegar into the meringue until combined
  7. Take spatula and evenly divide the meringue into the two circles traced on the parchment paper
  8. Take an off set spatula and smooth out into circles and smooth out tops...you can make swirls or kisses on the side for an interesting design
  9. Place baking tray with meringues in 325 F pre heated oven but immediately turn down to 300 F and bake for 1 hour.
  10. Once bake time is finished, turn oven off, but do not remove or open door to oven!!! Leave in oven for at least 2-3 more hours. !Important otherwise major cracking and/or sinking pavlova! (keep in mind a little sinking and a little cracking is okay!)
  11. Allow to complete cooling outside in room temperature
  12. DIRECTIONS - CURD:
  13. While the pavlova is baking, in a medium saucepan, cook the stemmed white currants and the water for about 5 minutes all the while mashing them with a potato masher
  14. Once the berries have reduced, remove from heat and push the currant puree through a fine mesh strainer into a bowl... (you'll be left with about ¾ cup of currant puree) ..discard seeds and skin
  15. In a clean saucepan over medium heat add the egg yolks, sugar and white currant puree until well mixed and dissolved- whisking constantly about 4 minutes
  16. Add butter cubes one at a time once mixture warms up and is lightly bubbling and whisk frequently for another 5 minutes or until the mixture is thick and bubbling
  17. Strain through sieve into a bowl (for quicker cooler, use a baking tray lined with parchment paper.)
  18. Cover with plastic film so it touches the curd and refrigerate
  19. DIRECTIONS - WHIPPED CREAM:
  20. Take a clean stand mixer bowl, the whisk attachment, the cream and pop in freezer for 10 minutes
  21. Put the cream, sugar and vanilla extract in the cold stand mixer bowl and whisk on high speed for 1-1½ minutes or until medium stiff peaks form - do not over mix!
  22. ASSEMBLING PAVLOVA:
  23. Place first meringue layer down on your cake stand, take an offset spatula and spread the cooled down white currant curd evenly over the layer
  24. Place next meringue layer on top ...top with all the whipped cream
  25. Garnish with some white currant berries
  26. Keep refrigerated for up to 2 days, however be aware pav will become soggy. Best to consume same day it's been prepared.
  27. Pavlova discs can be made a few days in advance and stored at room temperature in an air tight container with parchment paper between the discs to avoid them from sticking
3.5.3251


Filed Under: berries, Cakes, Curds, Meringue, Pavlova, Summer

Primary Sidebar

Stems & Forks Newsletter

Categories

Archives

Copyright © 2023 · stemsandforks.com · Disclaimer · Terms of Use · Privacy Policy · Contact